Like my drawing lessons? Get more on YouTube:

Human reverence for skulls has a long history. Prehistoric evidence suggests that in some cultures the skulls of deceased ancestors were purified and separated for worship. Animal skulls were used in rituals designed to aid in hunting.
In art and culture, skulls often represent death or evil. Some ancient cultures made crystal models of human skulls to represent life. Sugar skulls are candies made, decorated, and eaten as part of the Day of the Dead celebration, roughly equivalent to Halloween and the Roman Catholic holiday known as All Souls Day.
Today skulls, especially in fire, are used to signify rebellion, detachment or alienation from motorcycle clubs, heavy metal music groups and other cultural groups. Many clothing and accessory designs feature skull patterns. Blazing skulls are also a frequent subject for tattoos. A number of comic book characters have also been known to spontaneously combust, exposing their skull amidst flaming flesh.
Want to draw a flaming skull? Now you can with this easy step-by-step drawing tutorial. All you need is a pencil, a piece of paper and a good eraser. You can also use colored pencils, colored pencils, markers, or other tools to shade the finished drawing.
If you enjoyed this lesson, see also the following drawing guides: Fire, Demon, and Sugar Skull.
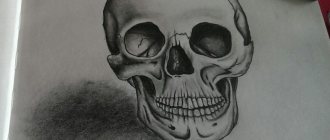
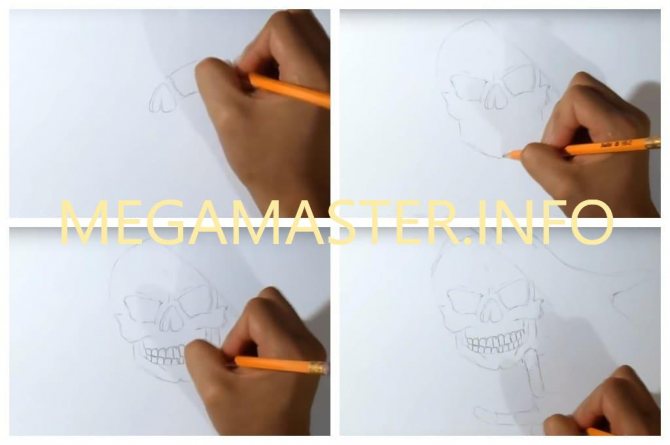
How to draw a skull in pencil step by step for beginners
Skulls are considered common symbols that signify different superstitions for each nation. Many people like such silhouettes and want to learn how to draw them. In the material provided, we will tell you how to draw a skull in pencil step by step for beginners, as well as provide detailed instructions for several drawings.
A simple skull drawing diagram


Drawing by Cells
When you have already coped with the drawings of Momo, and you enjoyed depicting unusual pictures, we propose to figure out how to easily draw a skull. If you are new to this type of art, but want to learn how to portray these silhouettes, then this lesson is perfect to get you started. Let's get started:
- Near the top of the sheet, in a horizontal position, draw a line three cells long.

On the sides of this sketch, put vertical lines in one cell. Connect the sides of the outline with a large semicircle. - Now, in the middle of the sketch we draw eyes in the form of circles. On the underside of the sketch lead two straight lines length in one cell. Shading the silhouettes of the eyes.
- Show in the head protruding bone or draw a rose. Similarly, add a bone on the other side of the figure. Draw a mouth in the form of a triangle, fill it in.
- Next, under the drawing write "Danger" or "Stop". Draw around the perimeter of a rectangular figure. Decorate the area with oblique lines.
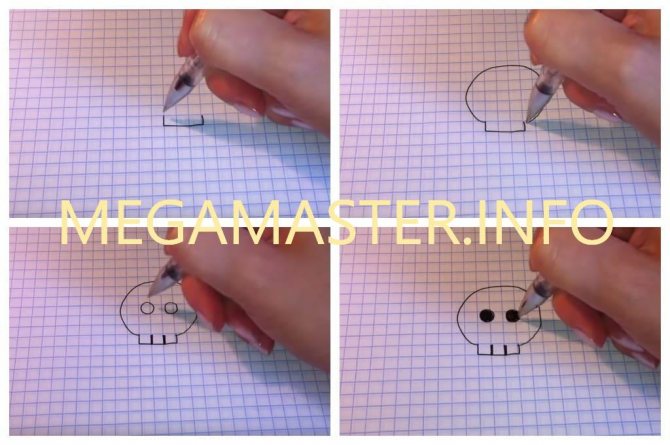
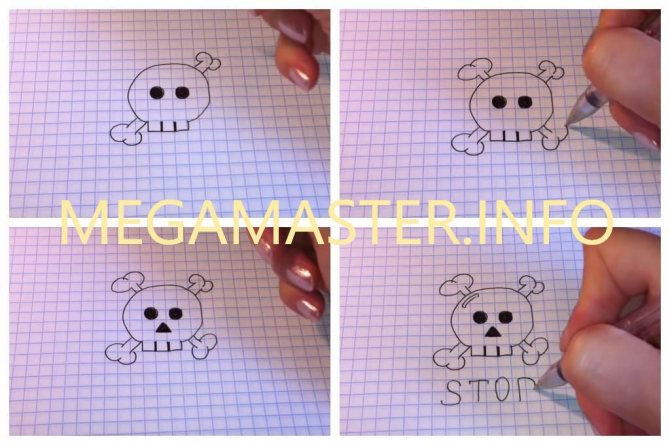
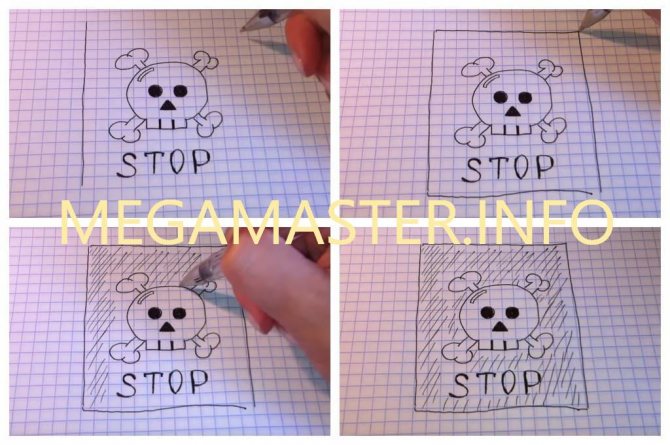
The sign with the skull is ready. Of course, you could just draw the silhouette of the skull and not add extra elements, but we decided to embellish the drawing a bit and added these parts.


Drawing the nose and teeth
Step 1
On the back of the skull, we draw a small circle.

Step 2
Divide the bottom part of the circle from the previous section into three segments.

Step 3
Draw a curve through the four points.

Step 4
Above the loop we draw a circle. In this place we will draw an eyebrow.

Step 5
From the eyebrow to the jaw, we draw a line.

Step 6
Between the hinge and the eyebrow we draw a neat curve.

Step 7.
Under the oval, draw a line parallel to the long line that crosses the oval.

Step 8
Under the eyebrow, draw another curve. This will be the bridge of the nose.

Step 9
From the tip of the bridge of the nose, draw a line to the center of the circle on the jaw.

Step 10
The upper right part of the circle on the jaw is divided into three segments.

Step 11.
From the extreme point on the circle, draw a line to the bottom curve.

Step 12.
Draw three curved lines for the teeth.

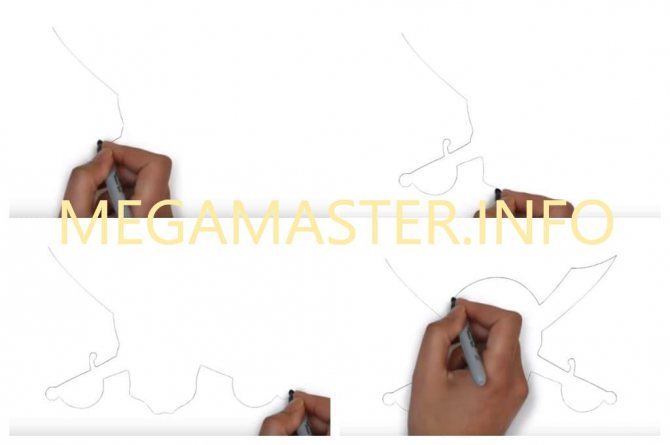
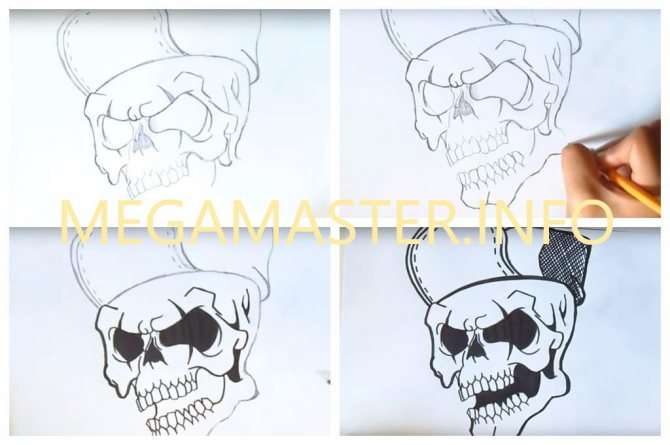
Skull with Swords
This job is a little more complicated than the previous one, but if you were able to draw an angel, you won't find it difficult. Now, let's learn how you can draw skulls with a simple pencil using step-by-step instructions for beginner artists. Let's start drawing:
- On the left side of the sheet, about in the middle, draw a slanted segment.
To it we add a small vertical sketch. To this silhouette we finish drawing the contour of the sword handle. - We complete the work with the bottom part of the skull. At the end of this figure we draw another sword handle. Draw a small segment upwards and draw the sword blade.
- Next, from the end of this silhouette, draw the top of the skull and depict the second point of the sword. Detail the upper parts of the sword. In the middle of the head contour divide the front part. Detail the handles of the weapon.
- Now, in the lower part of the sketch we show the jaw. Complete the drawing with teeth. On the forehead and cheekbones, we show cracks in the lines. Draw eyes in the form of a jagged circle. We show the depression of the nose. Re-detail the handles of weapons.
- Then, we take a black marker and trace the entire drawing around the perimeter. This color highlights the dark places on the silhouette. And finally paint the eyes.
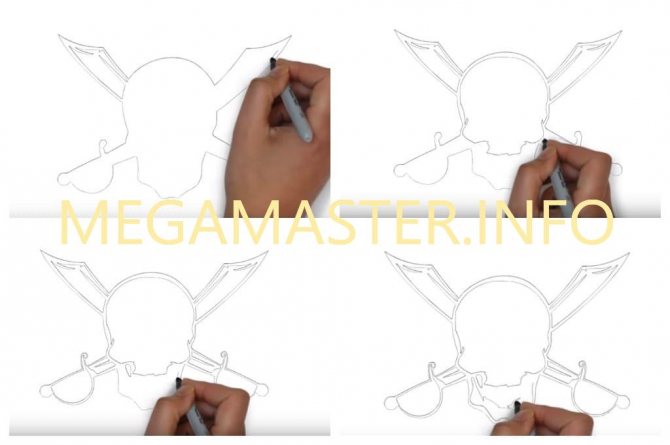
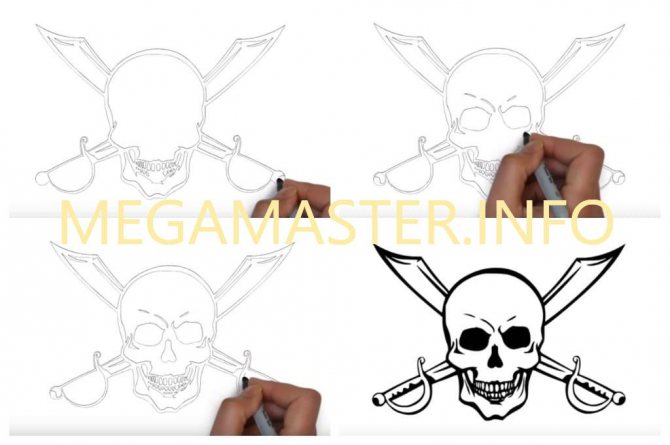
The work is done. So, you learned how to draw the skull step by step in several ways. But we will not stop there.
Graffiti on paper
If coped with the previous options, let's complicate the task a little. Now let's draw a graffiti with a skull silhouette on it. If you are just learning to draw, you must follow our instructions completely to get the desired result. For this work, you will need a simple pencil and a black marker to color the drawing. Once we have these things ready, we can start the creative process.
How to easily draw graffiti in the form of a skull:
- In the middle of the sheet, deduce the silhouette of fire, if you do not know how to draw it our website megamaster.info will help you.
Immediately shading this sketch. Near the top of the fire we draw a horizontal wavy segment. On both sides of this segment, we add a wishbone and deduce the eye. - Next, in a similar way draw the eye on the left side of the sketch. Detail these areas and show vertical arcs with thick lines. Let's draw the contour of the head. Show the upper jaw and detailing the skull.
- Now, a semi-oval draw a hat on the head of the skull. We divide it into two sections and show the folds in the fabric. Decorate with visible stitches in the form of a dotted line. Draw this part of the sketch with a thicker line.
- Then, finish drawing the border of the lower jaw, showing the teeth on it. Point with a thick pencil and specify all the details.
- We proceed to work with the marker. It circled all the strokes. Paint eyes and part of the nose. We show the dark area behind the eye. We paint the perimeter of the mouth and finally decorate the right side of the hat.
Graffiti with a skull is ready. Here's how you can draw a realistic skull step by step. The work, of course, for independent drawing is difficult, but, and according to our instructions, you may well be able to repeat this masterpiece in your scrapbook.
Drawing the jaw
Step 1
Draw a short oval line downwards.

Step 2.
Marks on this line.

Step 3
Draw a horizontal line crossing the bottom point.

Step 4
Now divide the right quarter of the oval into four segments.

Step 5.
From the first point draw a line downwards.

Step 6
From the buttonhole draw another line down, parallel to the previous one.

Step 7.
Divide the last line into four segments.

Step 8
Cross the center point with a perpendicular line. Its length should be the same as the length of the segment that this line crosses. Note that this line must be parallel to the longest line crossing the center of the oval.

Step 9
Circle the resulting symmetrical cross. To simplify the task, use the way of drawing circles that we used for the oval.

Step 10
Close the shape of the jaw with two additional lines.

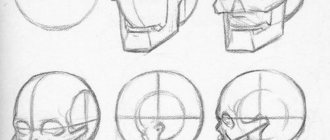
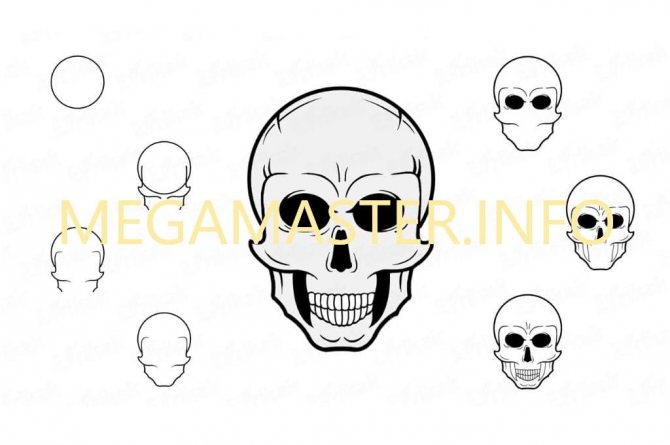
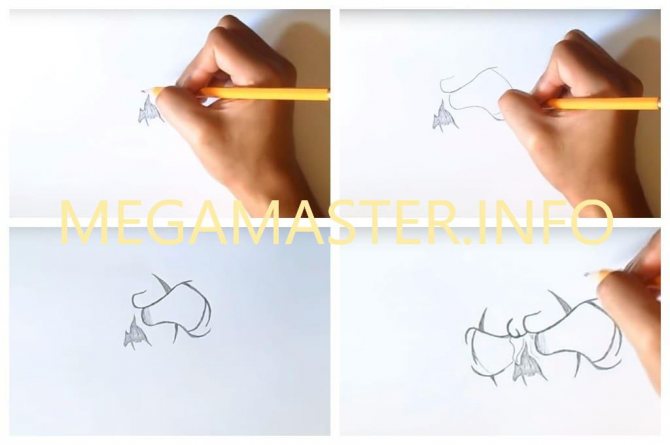
Human skull in pencil
With the previous work sorted out, now let's draw a human skull with a simple pencil. The work is not difficult, but it is ideal to learn how to draw these silhouettes. If you learn how to depict the skull, then later you will be easier to depict people, because to draw the human head you need exactly that knowledge of the proportions of skulls.
Let's start drawing:
- In the middle of the sheet we draw a vertical line, its length will indicate the length of the picture.
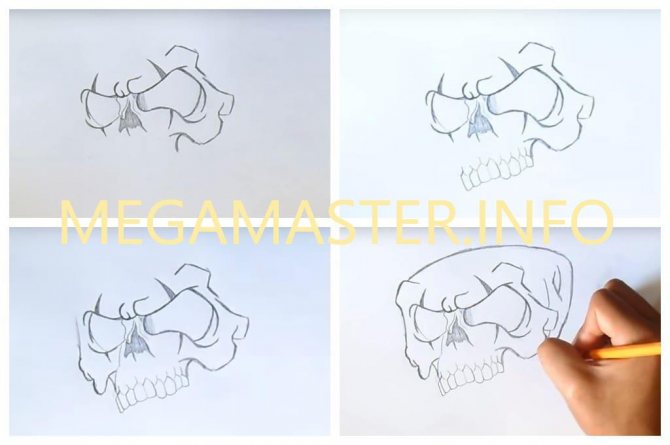
At the top of the vertical line we put a horizontal marker for the height of the skull, with an identical segment we divide the line in half. Measure the length of the segment and divide it into three parts. - Next, along these two marks we draw the horizontals. In the area between the top and the third line from the top derive a circle. Starting from the circle draw two lines down to the next horizontal. Draw a line and show the contour of the skull.
- In the middle of showing the nose and starting to deduce the eyes. We specify a thicker layer perimeter eyes.
Now, detailing the area above the nose, put the jaw perimeter. We divide the mouth into two sections, and portray closed teeth. Tint the shadow areas above the jaw. Use a soft black pencil to draw the eyebrows over the eyes. - Shade half the perimeter of the eyes, the area in the middle of the jaw, and refine the other dark places on the silhouette. Pen black to trace the teeth.

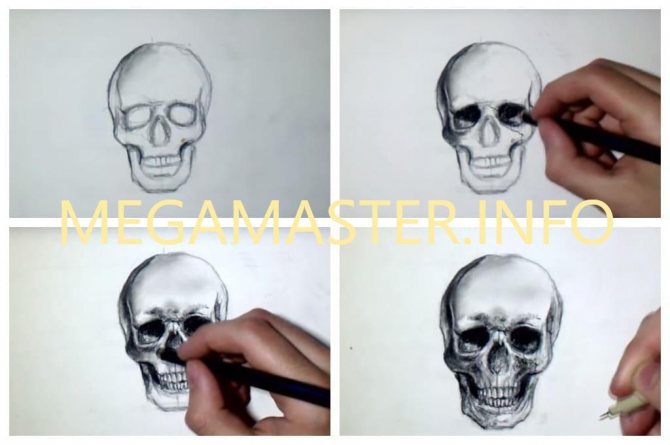
The image is ready. You have learned how to draw a human skull. This image is complicated, especially while working with shading and blurring, but to get the desired result, you need to follow the step-by-step instructions.
Drawing the base of the skull
Step 1
First, draw a simple line. The length of the line depends on your preference - the longer, the larger the drawing will be. If necessary, do not be afraid to use a ruler.

Step 2.
Determine the center of the line and mark it.

Step 3
Draw a new line perpendicular to the previous line. Let it be slightly longer than the first line.

Step 4
Draw a copy of the first line on the opposite side, forming a cross shape.

Step 5.
From the resulting cross, we will draw an oval. If you're having trouble drawing such figures, do the following: start with light strokes between the two ends of perpendicular lines.

Then draw a clear line with these strokes.

Use this technique and finish drawing the oval.

Step 6.
Find the center of the left quarter...

...and divide this side into six equal sections.

Step 7
Using a curve, connect two points through one.

Step 8
We divide the previous line with another curve, forming a loop.

Drawing a skull in the hood
Of course, if you were able to draw all the previous pictures, you can stop learning this material. But we suggest to consolidate the knowledge gained and draw the silhouette of a skull in the hood. This drawing is suitable for both children and adults, the main thing is to adhere to our instructions and follow all the requirements, especially if you are new to the visual arts.
We recreate the silhouette of the skull:
- Starting in the middle of the sheet, draw out the shape of the skull's nose.
On the sides dorisovyvayut eye hollows. We mark the borders of the head under the hood. - Highlight the cheekbones and draw the perimeter of the lower jaw. Step back from the bottom a little bit up and make preliminary sketches of the mouth. Draw a lot of upper and lower teeth in the mouth. Sketch the borders of the hood.
- Detail this sketch with folds. Step back from the drawing of the skull a little bit down and show the bones and fingers of the hand. Continue to detail the hood and the rest of the cape.
- Then, finish drawing the border of the hood on the left side. Draw around the entire drawing with black marker.
Highlight the folds of the cape on the left side. Show a line detached from the hood of the cape. The lines specify the folds at the top of the cape. We isolate the sleeve from the clothing. - Next, draw the silhouette of the limb. Detail the sleeve of the cape. We paint over the eyes and the hollow of the nose with a marker. We bring out the dark places in the jaw, and finally under the head we finish drawing the spine, which supposedly holds the skull.

The drawing is ready. You see, to depict the skull on paper is not as difficult as it may seem at first glance. If you follow the instructions in detail, the work is quite manageable for a child.
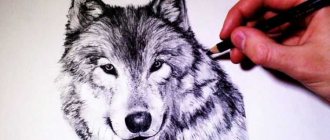
Another suggestion to read the material, the drawings of the wolf. These images are no less interesting, our today's material.