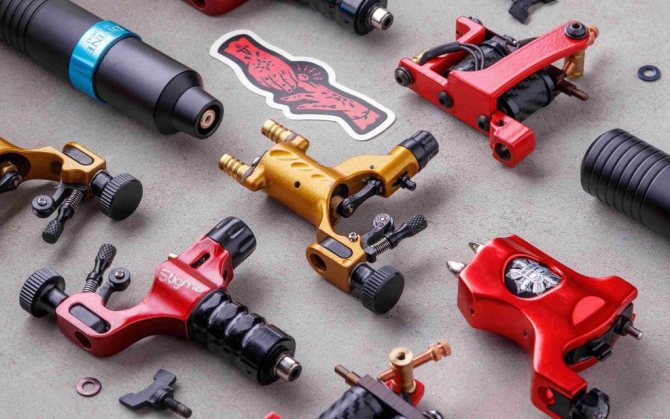
The main feature of all induction-type tattoo machines, regardless of the name and cost, is that each of them is designed to perform certain types of tasks. Such tasks may include tight or delicate contouring, tight shading, or simply creating a shadow. The execution of clearly defined tasks by tattoo machines, is achieved through their correct settings.
All basic, basic elements are laid down by the manufacturer at the stage of tattoo-devices production. This may include a certain number of turns of wire on the coils, the volume of the capacitor, the basic mass of the striker, the holder. It is better not to change or try to reconfigure all these elements. Otherwise, the device can fail at all and lose the original technical and functional characteristics.
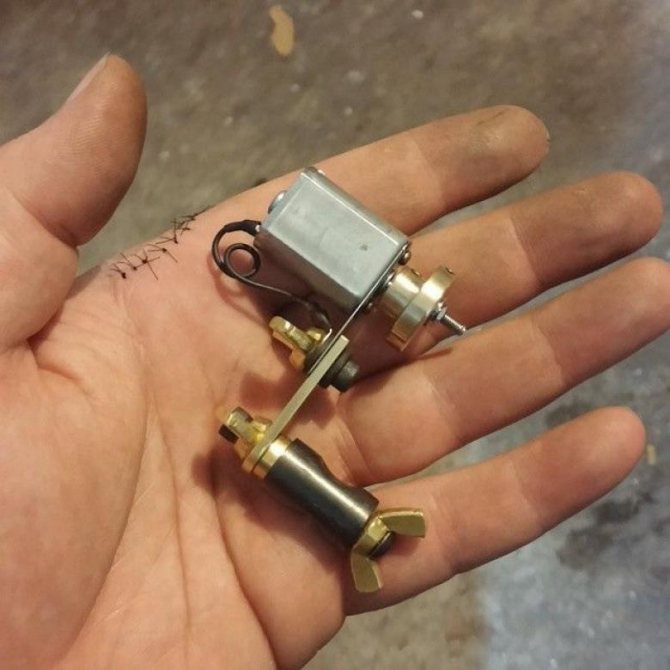
Before you assemble the induction tattoo machine, it is desirable to remember in what position the screw is. In the future, such information can come in handy.
Most often, at the stage of production, the device is already set up with regard to the tasks set before it. It is possible that it will be necessary to adjust the pitch of the needle of the tattoo machine. But this is quite easy to do on a special training skin for tattoos.
Necessary accessories
In the absence of the possibility of buying a kit for beginners, as well as spending money on the salon, you can cope with the task, relying on their own strength. Not everyone immediately decides to do such an event because of the unusualness and novelty of the procedure. But as in any other business, if you show persistence and set a goal, it is possible to realize what you have in mind!
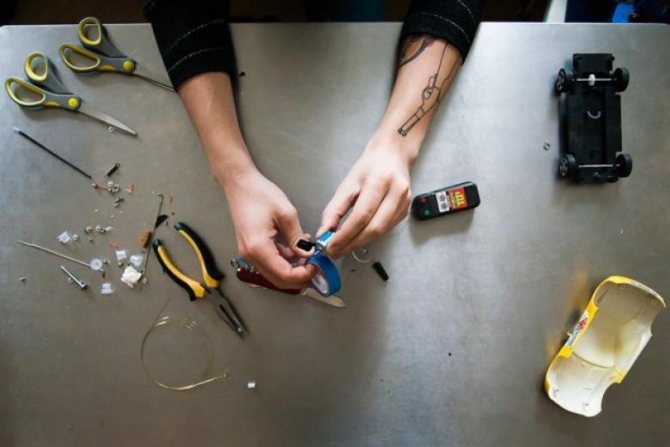
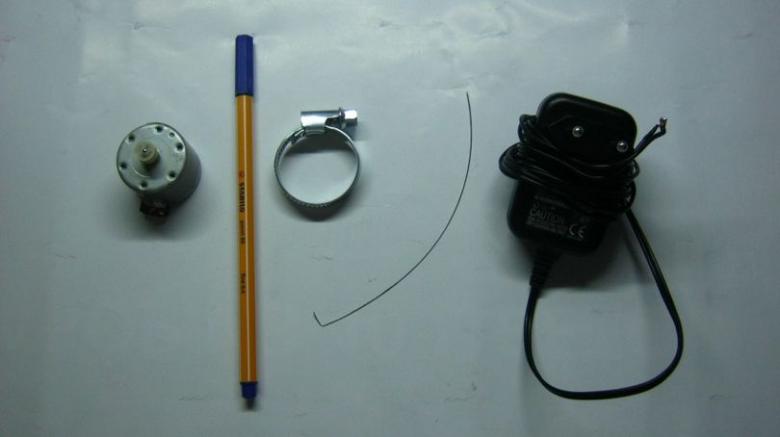
Tools are always available for sale, and many of them are in the home storehouse of the craftsman. Since the main elements are a needle and an electric motor, you can use a sharpened guitar string #1 or #6. If you do not have access to the instrument, it is replaced by a regular needle included in the beading kit.
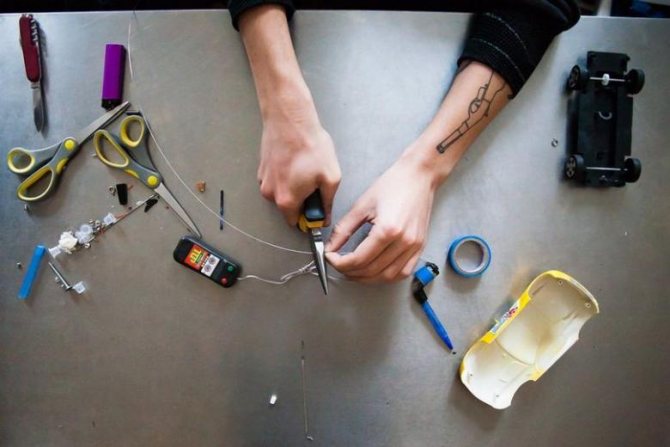
Even easier to find an electric motor, which is equipped with toy cars, electric shavers or players for scrolling cassettes. If you do not have them at home, thank you that you can absolutely inexpensive motor at the market in the section of radio goods or a used spare part. The power should be at least 12 V, the best option is 18.

What problems should you immediately contact the manufacturer with
If during the adjustment process of rotary and induction tattoo machines such problems arise, as: complete replacement of the motor, nodes, separate elements of the body, you must immediately contact the manufacturer or its official representative. Such work should be performed by an experienced specialist.
After buying rotary or induction tattoo equipment, during the whole warranty period it is necessary to save the package, the warranty card and the receipt. This will allow you to make a diagnosis and warranty repair free of charge with a valid warranty.
By-Products
You will need as incidental items:
- A pen or pencil - will serve as a case.
- A spoon, aluminum fork, or toothbrush to staple or tie - to attach the motor to the housing.
- Duct tape or soldering iron, wire cutters.
- Power source - a battery charger with the right voltage.
- Gear, a button.
The list of items can be different. It should be based on what kind of machine is being created and what exactly is planned to be purchased. Knowing how the device works, you can use any suitable parts.
What is the power?
To begin with, the power equipment should be mentioned. This is all that supplies current to the motor or coils of the tattoo machine:
Choosing the cord.
There are two types of power cords for tattoo power supplies: a large one with a ground contact, and a small one without a ground contact. Both types are very common in consumer electronics, and you can easily figure out which cord you need for your power supply.
A typical switching-mode power supply with a two-pin mains connector. Its main advantage is its compactness, and at the same time a solid power.
Large mains plug with a zap on the power supply
However, there is another type of power supply - voltage regulators without a built-in converter of alternating 220 volts into constant 12. 20 volts. This format is very popular with builders. Its advantage is the compactness of the regulator itself. In its size it can be smaller than switching power supplies. Due to the design, they do not need a power cord - its role is played by the actual converter of the mains voltage, which is plugged directly into the socket.
A typical example of this solution is this power supply from Ivan Grovny. The unit is only a voltage regulator, but the real power supply, a voltage converter, is plugged into the socket, and is the familiar to many adapter - a weighty black box with a plug on one side and a wire on the other.
The disadvantage of this solution is that now you will have to ask not only about the "power supply" from the builder, but also about that little box that is plugged into the socket. It may well not produce the desired 3 amps, and no sophisticated block regulator from the builder will not fix it.
Connecting the Power Supply
Power supply is selected by the current it is able to output. Tattoo machine for beginners, as a rule, enough for 1,5. 2 amps - it will approach the appropriate unit. More professional machines from billers or world famous manufacturers as a rule require 3 amps, and without a powerful source will not work. The tasks of the power supply are:
- To smoothly change the voltage output, thereby giving the craftsman the opportunity to adjust the machine optimally;
- to provide enough power reserve to avoid voltage sags at high loads;
- provide long-term - up to several hours - operation.
Connecting the power supply is simple. On one side, it connects to a 220 volt mains supply. On the other, it has one or, more often, two jacks to connect the pedal and machine. The machine and pedal are connected with clip cords.
Connectors on power supply for pedal and tattoo machine
Connecting Clip-Cord
Clip-Cord is a low-voltage cord for connecting the pedal and the tattoo-machine to the power unit. It comes in two types - with RCA connectors on both ends, and RCA on one side and terminals on the other. Look at your power supply, tattoo machine and pedal and you will immediately understand what is connected to what. Clip cord must be:
- flexible, so as not to hinder the movements of the master;
- Strong to withstand numerous kinks and jerks;
- Reliable to withstand a large enough current without loss or heat.
Connecting the Pedal
The pedal is an ordinary switch controlled by the foot. As a rule, it has screw terminals, and it requires an appropriate clip-cord. The exception to this are push-button "pedals. These are switches with fixed positions - essentially a button built into the Jack. It does not need to be held with your foot all the time, it is manually operated.
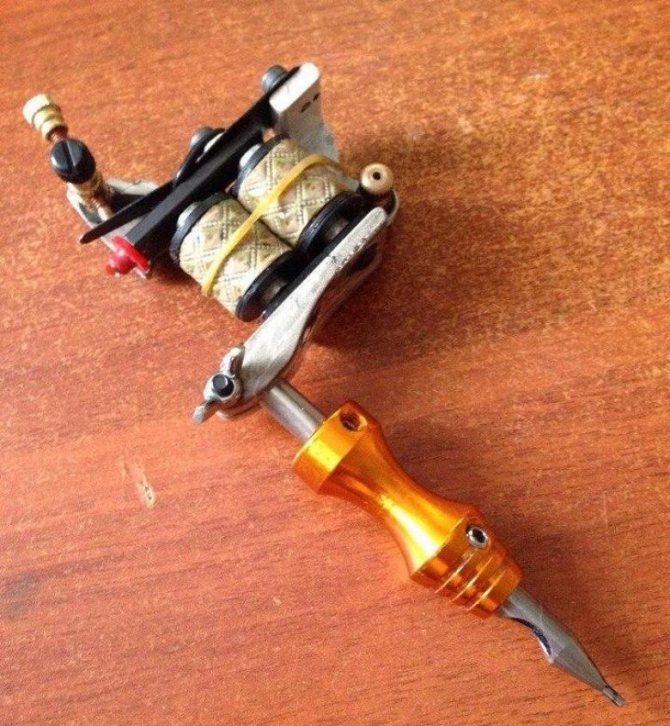
Rotary Machine Assembly
The option of a small electric motor is just right for those who are not used to tinkering. Induction machines do not have a motor. Instead, they are equipped with a pair of coils that generate a magnetic field. Without knowledge of the basics of mechanics and the rules of handling metal, not everyone will be able to make them. That is why it is better to choose a rotary machine.
The list of items from which it is assembled is as follows:
- Electric motor.
- Charger.
- A button with 4 holes.
- A pen or pencil.
- An aluminum spoon.
- Guitar string.
- Insulating tape.
- An antibacterial product.
The way step by step.
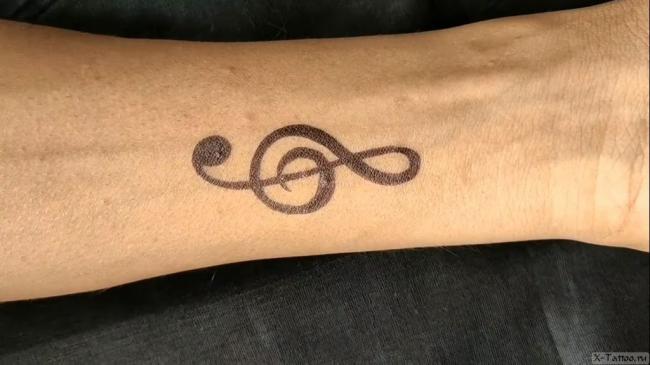
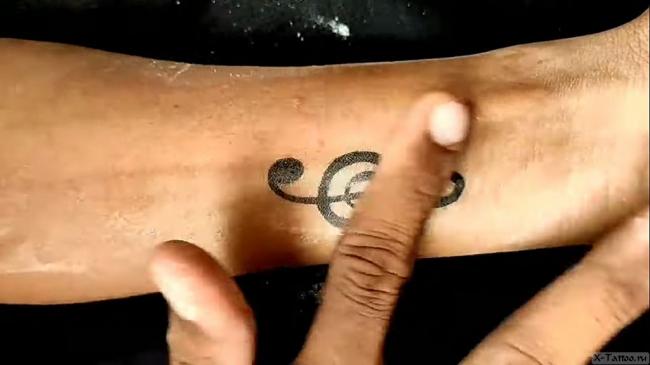
There are several ways to make a temporary tattoo at home. Somewhere you will need a pen, somewhere a marker, and somewhere cosmetics. Once you understand the specifics of each method, you can then combine them and get new results.
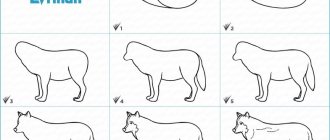
The sketches themselves can be seen in this article or here: 250+ small tattoos.
The beauty of your future tattoo will depend on how pumped up your drawing skills are. If the maximum of your ability is a crooked little man, it is better not to start with the latter method. It's a real treat to walk around with a scary tattoo for a month and you'll regret it later. We advise to start with an easier way or find someone who can draw well.
- Two-tier wedding cake - an elegant way to realize the fantasy (63 photo novelties)
| Way 1 | Way 2 | Way 3 | Way 4 | |
| You will need | Pen + hairspray | toothpaste + cosmetic pencil + face powder + hairspray | toothpaste + marker + face powder + shoe polish | laser printer + perfume |
| How long does it last | a few days | about a week | a month or more | a day a week |
A little bit below we will explain each option step by step. Follow the instructions step by step and you'll be fine.
Warning. Allergic reactions are possible when using pens, markers and cosmetics! If redness, itching, and rashes occur, wash the drawing off immediately and consult a dermatologist!
Method 1: for a couple of days
Need: pen and hairspray or cream.
- Find a sketch of a simple tattoo to draw with. You can choose from the ones we picked up. You will find them at the end of the article.
- Choose a spot on your body and redraw the sketch there with a pen. About which pens are suitable and which are not, we will tell you a little later.
- In this form, the temporary tattoo will quickly erase. To make it last longer, apply a thin coat of hairspray over the fresh tattoo. This will make it last for several days. You can use water-repellent cream instead of varnish.
Drawing
Dab of cream Check
Method 2: for a week.
Need: toothpaste, cosmetic pencil, face powder and hairspray.
- Choose a sketch of your desired tattoo that you can redraw. Lightweight tattoos will be a priority.
- Squeeze a small amount of toothpaste on the place of the future tattoo and rub it all over.Remove the excess with a napkin.
- With a cosmetic pencil draw a tattoo on this place. Read more about the choice of pencil below.
- Take a cotton pad, put facial powder on it and go over your tattoo with it. The greasier the layer, the longer the tattoo will last.
- Fill the resulting work of art with hairspray or rub it with cream, as described in the first method. Such a temporary tattoo can easily withstand the pressure of water, and it will not be so easy to wash it off. It's sure to be a joy to behold within a week.
Dab the paste Draw the powder Dab the cream Check the
Method 3: for a month.
You need: toothpaste, marker, face powder and shoe polish.
- As in the first two methods find a suitable drawing for the tattoo. It is not necessary to look for a sketch, you can srisovat and with a photo.
- Rub the selected location on the body with toothpaste. The paste is enough as much as you apply to the brush when you brush your teeth. Get rid of the excess.
- Next we need a marker. Use it to draw a tattoo on the prepared place. The life of the tattoo will depend on what marker you use. About their variety will be further.
- We cover the finished tattoo, made at home, with face powder in several layers, using a cotton disk.
- Then we will cover the composition with shoe polish. A couple of spritzes will be enough. Be especially careful at this stage, it's chemistry after all. If anything goes wrong, rinse it right away. Although it will be difficult to do. Such a tattoo can last a month. Some artisans wear them for 3 months.
Paste the paste Draw the powder Powder Sprinkle the varnish Check
Method 4: transferable
Another method that is noticeably different from the others is translating the tattoo from paper to the body.
For this, we'll need a little more serious items: a printer (laser, not inkjet) and perfume.
- We find a ready-made sketch and print it on paper at the right scale.
- We cut, indenting a couple of centimeters from the outline, for greater convenience.
- Profusely spray paper with a drawing of perfume.
- We dip the resulting transfer in water for 3 seconds and press the pattern to the desired location on the body.
- Carefully hold the stencil, trying not to smudge. The holding time depends on your perfume. It's hard to be specific, but about 5 to 15 minutes. You can at this point still spray perfume on top of the drawing. Then peel off the paper.
Cut out Spritz the perfume Dip it in water Press it down Peel it off
This way not everyone gets it right the first time. A very important role is played by the choice of spirits and the percentage of alcohol in them. If it didn't work, try again and hold it longer.
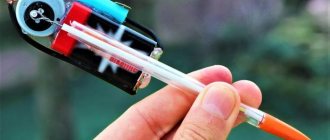
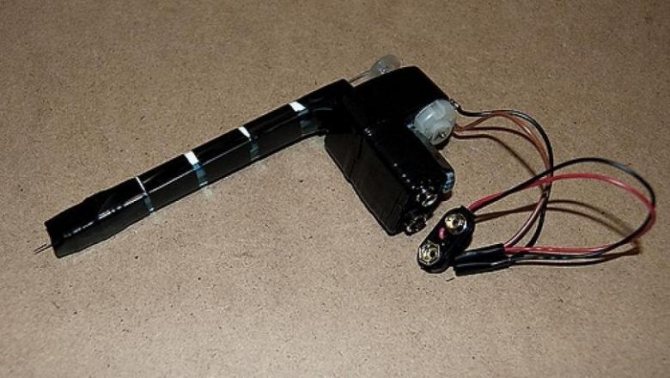
Step by step instructions
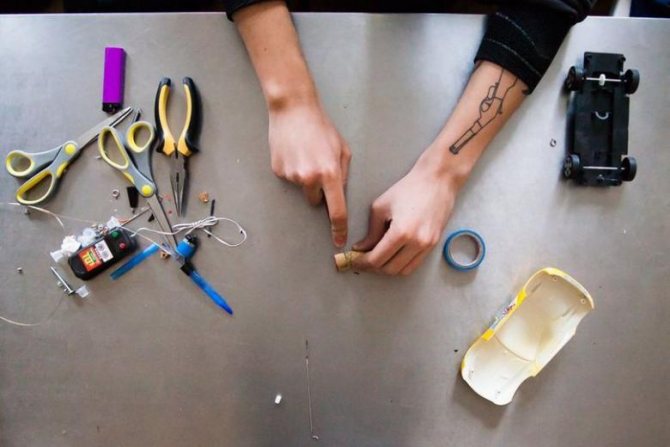
- On the shaft of the motor, you should find a pinion. A button is attached to it with superglue so that the holes remain free of glue. It should be left to dry for a while.
- The rod of a pen or mechanical pencil, cleaned of ink and washed with water, is treated with an antibacterial compound. On the side of the ball the tip of the rod is sawn off a little to fit the guitar string. Its length should coincide with the size of the rod.
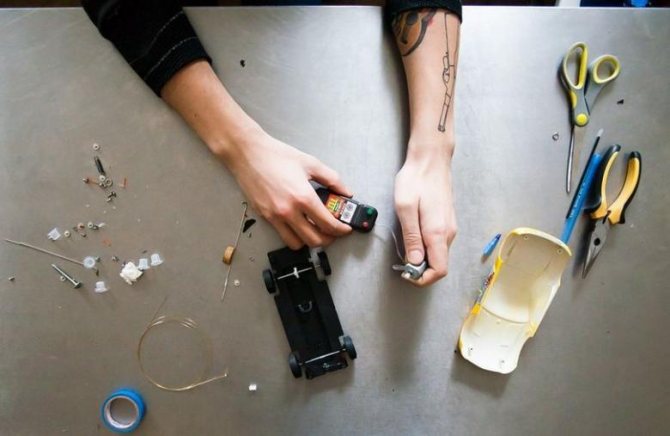
- A staple is made from a spoon to fasten the motor and the body. It is represented in this case by a pencil or pen. The part of the spoon intended for eating is broken off, and the handle is bent in a letter "G". As a result, a staple is formed.
- Ballpoint pen and staple are fastened with duct tape along the handle. It is necessary that its end and the place of the bend coincide, being at the same level, not to miss. Similarly connect the motor to the button.
- The string from the guitar is inserted into the handle, the end is bent to the letter "P". At the end of the process, it passes into the opening of the button.
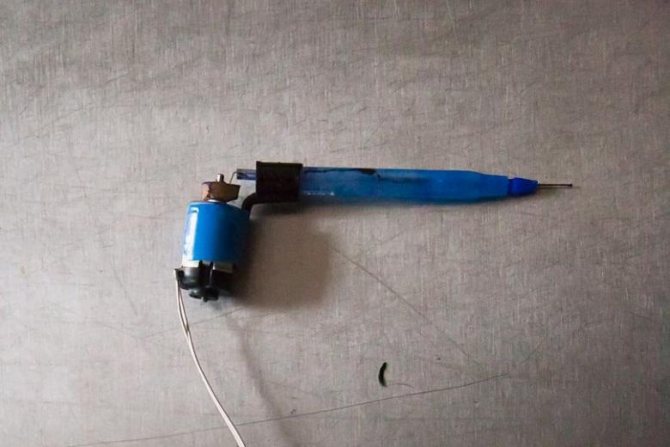
The algorithm is quite simple. No complicated manipulation or special parts are assumed. Next, you need to test the assembly on a piece of leather taken from a jacket or bag and turn on the charger. You can also test the machine on a banana peel. The video on the site will explain in detail the sequence of operations.
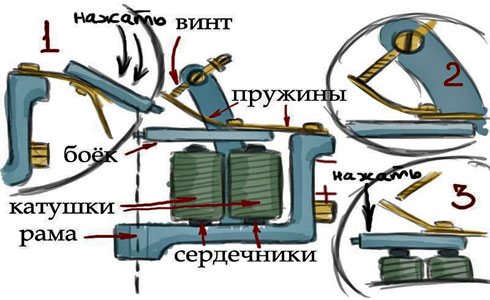
Operation of induction tattoo machines
Buying a tuned tattoo machine for work, take for yourself the main rule - do not get into the settings of the machine out of idle curiosity, do not twist anything unnecessarily, do not disassemble the machine yourself, having no idea about the device and tuning - the machine is completely ready for operation. In case of malfunction or breakdown, the first thing to try to contact the manufacturer, a normal machinebuilder will never refuse a full consultation and any possible assistance.
Introduction Immediately after the purchase of the tattoo machine, stock up on a special lubricant, because for trouble-free and long life the machine needs an additional and uncomplicated care. This can be regular gun oil, which is sold in any hunting store. Wipe all steel parts of the tattoo machine with an oiled rag, about once or twice a month, to make sure there is no corrosion or rust. In addition to losing the appearance of the machine, corrosion poses a serious danger to the springs, since any micro-damage on their surface, sinks and cracks will quickly lead to failure. It is especially important to "oil" machines after using chemical disinfectant solutions containing aggressive components which cause corrosion.
Connection and operating voltage Always use a polar clipcord connection, even the highest quality polar capacitor requires this, controlling the correct completion of the shock cycle and extinguishing the spark at the point of contact. Today, because of their low cost and popularity, polar capacitors are used on almost all induction machines. In 99% of cases the clipcord is connected in the following way: plus to the back post, minus to the frame (back post), for a reason quality clipcords have different polarity "whiskers" marked with a different color. Incorrect systematic connection of the clip to the machine, leads to deterioration of performance of the tattoo machine and reduction of service life of the capacitor, with inevitable replacement of it as a result.
Working voltage is a crucial point because many people try to compensate wrong operation or design flaws of the machine by simply raising the operating voltage of their power supply, and as a result the voltage is 2 or more times different from the optimal one. For a short time it can help, but... new problems arise: machines start to warm up faster and stronger, the spark at the contact point becomes like a welding machine - the contact screw quickly burns out and gets worn down, the tattoo machine gets finally upset and just can't work properly!
What should be the correct operating voltage? There is no unambiguous answer, because everyone uses different machines, power supplies, and connecting wires, but you can follow some guidelines that are appropriate for most cases. Turn on the fully equipped machine and moisten the tip with paint or common water (this is important, because the friction of the dry needle in the nozzle can affect the operating voltage), gradually increase the voltage on the PSU, holding the firing pin with your thumb - the impact should be accentuated sensitive, while visually the firing pin will double or triple, the sound - remain clean and clear, in no case rattle and not float in the tone. With good quality wires, power supply and correct machine tuning, the operating voltage will be within 6-8 volts.
Heating It's basic high school physics - as electrons pass through a substance, they transfer their energy to the body through which the current is flowing. The energy of the particles increases and their speed increases, the conductor heats up.. The more resistance is the conductor (in our case - magnetic circuit of the machine, its coils and frame, as well as connecting wires) to the passage of electric current, the more energy the electrons lose, the more the conductor is heated, because all the energy lost by the electrons is converted into heat.
The heating process is absolutely normal for high-performance machines, but the devil, as always, lies in the details: the quality and wire cross-section on the coils, the material of the cores, the frame and even the screws for assembly, the cross-section and materials of the connecting wires and, of course, the quality of the power supply! In the last article we already discussed in detail the selection of equipment for tattoo artists.
If, while observing the other conditions, the tattoo machine still heats up too much, up to scalding discomfort in the hand - you just need to bend the front spring to the striker and unscrew the contact screw a little, and then re-adjust the machine (see working voltage).
Power Loss This applies primarily to the striker seals (nipples, grommets) and bandage rubbers. In order for the induction machine to work efficiently, it must be assembled properly before operation. The importance of such a detail as a seal is hard to overestimate, regardless of the material and shape of the seal, it should eliminate backlash when transmitting force from the striker to the needle bar, so it should fit in the needle, i.e. it should enter without effort, but also not loose, otherwise inevitable power loss will occur.
Also worth mentioning bandage gum, which press the needle, eliminating parasitic beating rod and the risk of slipping the rod from the punch pin - avoid excessive pressure on the rod rubber, as folded several times the hard office rubber "for money," proportionally eats power tattoo machine, and the closer bandage gum to the clamp holder, the more power "steals. Bandage gum should be soft and elastic, with a diameter of about 30-40 mm, one piece is enough to ensure the performance of quality tattoo machine.
I remind you that gaskets and bandages are disposable consumables and must be disposed of after each job (they can have particles of blood and pigment suspended on them), their properties deteriorate during several hours of continuous work and can negatively affect the operation of the instrument - do not save on comfort and safety.
Contact screw During constant use various parts of the tattoo machine experience considerable stress and vibration, between the contact screw and the front spring there is friction and an electric spark which, with time, erases the contact screw and the front spring - the contact spot is lost, and the initial settings will certainly change and "float". Many tattoo artists, especially beginners, "loss of contact" leads into a stupor and hopeless panic: "all is lost, chief, what to do, what to do?
Really, what to do in this case? Send the machine every time to the machine builder for tuning, often in another city or even another country, losing time and customers, or learn to tune the tool yourself?
The answer is obvious, especially since this kind of operation is easy and accessible even to a child: depending on the frequency of use of the machine and the material of the contact screw, periodically, you just need to tighten the contact screw, levelling its triggered part. You can determine the moment of correction of the contact screw by the operating voltage: the more volts your machine started to "eat", the more it is necessary to adjust the ideal "contact spot", i.e. to screw the screw in. This should be done very carefully, always with the machine on: slightly loosen the locking screw on the contact screw stand, and slowly screw in the contact screw, gradually, a quarter or half turn, while listening to the sound of the running machine - it should be clean and clear, without "farting", sticking and dips.
Springs The contact springs are hammered out or cut from a strip of special hard and heat-treated steel, and only in the longitudinal direction. If the manufacturing and preparation process of the springs is not followed, micro-cracks may form at the edges, and if incorrectly installed (excessive or repeated bending), internal stresses on the metal may occur. When used on an ordinary tattoo machine this may not manifest itself in any way, but with powerful tattoo machines, at higher voltages, breakages are likely.
So, spring breakage is a fairly common problem: replacing springs should be something every tauyer should know how to do, especially if you understand the process - it's a minute matter! Replacing the front spring - first, examine the parts of the broken spring, and note (or photograph), the angle of bend and distance to the striker. Take the new front spring and bend it slightly with your fingers all along the length, distributing the force evenly, except for the part with a hole, then install the spring and turn on the machine, if the bending is not enough repeat the operation - remove and bend the spring once again. Replacing the rear spring - without removing from the tattoo machine, inspect the parts of the broken spring, measure (and mark with a marker) the distance from the striker to the machine seat. Usually the rear springs are put without bending, almost all modern machine builders design the machine saddle with an already correctly set angle, this simplifies the installation of the rear spring and guarantees its long operation without breakage. If you still need to make the bend, do it in the same way as for the upper spring - orienting the bend upwards and towards the striker.
Act slowly and very carefully, the most common mistake is to bend the spring too much and try to bend it back, in this case you create additional internal stress and the risk of spring breakage in the nearest future is very high.
If the front spring is worn or burnt (there is a depression at the narrow, working end), also the "contact patch" is lost and the settings "fly off", in this case, you can clean off the fouling and level the spring tip with an emery or sandpaper, not forgetting to polish the surface after the procedure - usually helps, in especially bad situation - only replacement of the "hole" spring with a new one will help.
Operating Speed, Duty Cycle. The use of modern digital controllers with a developed indication system makes life very easy, especially for beginners - a pro is always easier and faster to determine the mode of tattoo machine "by eye", "by ear" or "on the finger":
- most contour machines run at 130-150Hz (DutyCycle 55-65%) - shaders for shadow work run at 110-130Hz (DutyCycle45-55%) - slow and powerful tinting machines run at 80-110Hz (DutyCycle 50-60%)
The above information is given when operating an uncharged tattoo machine, i.e. when the machine is idle, without a needle, but when you put it together and turn it on, the frequency is sure to be lower:
- for contouring machines up to 110-120 Hz - for shader-tanning machines up to 75-85 Hz - for high-powered tanning machines up to 60-75 Hz
However the speed of the machine far not always linearly affects speed of tattooing even if to reject the most important component of hands of concrete master, his experience and manner of work, the main thing here is dynamics of the strike itself so that at each penetration under the skin the needle effectively put there maximal quantity of pigment, with minimal trauma of skin surface - because of this depends on quality of final product - tattoo: how fast and comfortably it will fix, what bright color will remain, will not "pop" with time contours, how soon will pale?
For reference: DutyCycle (duty cycle or fill factor) is the ratio of the pulse duration to their period of succession, in the context of tattoo machine tuning it is a definition of the state of tension of both springs, which is reflected in the percentage of closed and open point of contact between the contact screw and the upper spring. Working cycle can be considered as influence of back spring in relation to front spring stiffness, the more it is, the higher will be working cycle, as well as painful feelings at tattooing, as "Duty Cycle" directly influences on rigidity of tattoo machine blow and as consequence, on traumatic danger of a tool in inexperienced hands. I want to note that too high DutyCycle also reduces the "life" of the springs, because of the high tension of the spring steel.
We have analyzed only the most common possible malfunctions that can be fixed by any practicing tattooist and simple methods of their elimination, deeper tuning, requiring a thorough knowledge of mechanical engineering, it is better to trust people who have known more experience and engaged in building machines professionally.
***
Yuri Tatuator
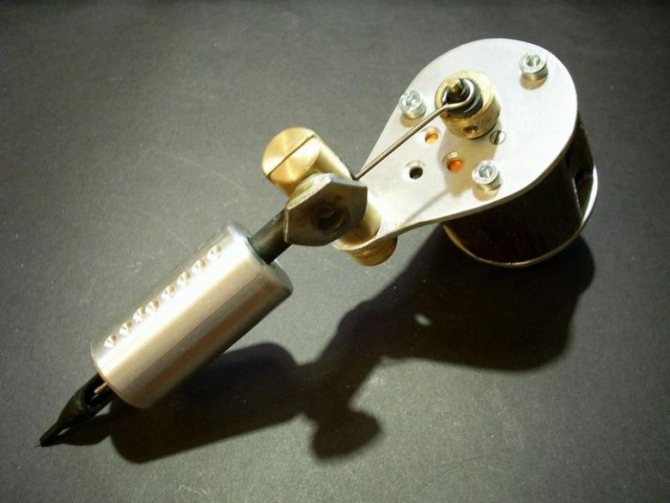
A machine without a string
It is important to note that the string, unlike other materials, perfectly holds the paint, is not subject to deformation and the effects of rust. But do not be upset if it can not be obtained. Necessary for the rotary type, it is not suitable for the induction machine. Because of the stronger puncture under the influence of induction, it easily breaks. A needle specifically used for tattooing will be appropriate here.
For homemade machines are not only suitable guitar strings. You can opt for a needle from the beading kit, which does not need to be sharpened. An additional advantage is that they are quite narrow.
All actions resemble the previous ones with the only exception - the running part of the needle holder is a steel knitting needle bent at one end. They are connected by means of a plastic pencil rod, which acts as a nozzle through which the needle is inserted. The bent end of the knitting needle is attached to the rotor of the motor which functions like a steam engine piston.
The main thing is protection
The next step is the use of barrier protection. We put a special package on a tattoo machine. The most important thing is that the bag completely covers the machine, does not interfere with the movement of the needle and did not fall off during the process. Put the special bag on the clip cord. For convenience, put a bandage rubber band on the clip cord connector and run it through the bag in peace. Do not pull the connector completely out of the bag, just poke the pins through the clip cord shield itself. This is quick, convenient and functional at the same time. If there is an RCA connector on the end of the wire, fix it securely with a bandage or adhesive tape.
The use of barrier protection is extremely important because it has a direct bearing on the hygiene of the tattooing process. The tattoo industry has long been accustomed to disposable needles, and makes full use of disposable modules - the needle and tip in a single cartridge. Disposable tips also long ago and tightly entered into a life of tattoo masters, not uncommon and disposable grips. Machines, and the power equipment, were and are the equipment of long term use. The worst thing is that this equipment is quite complex shape - it has many corners, protrusions and recesses. All this contributes to the accumulation of contaminants, which are then laborious to remove. Disposable protection effectively prevents them, and helps the handyman keep his equipment clean.
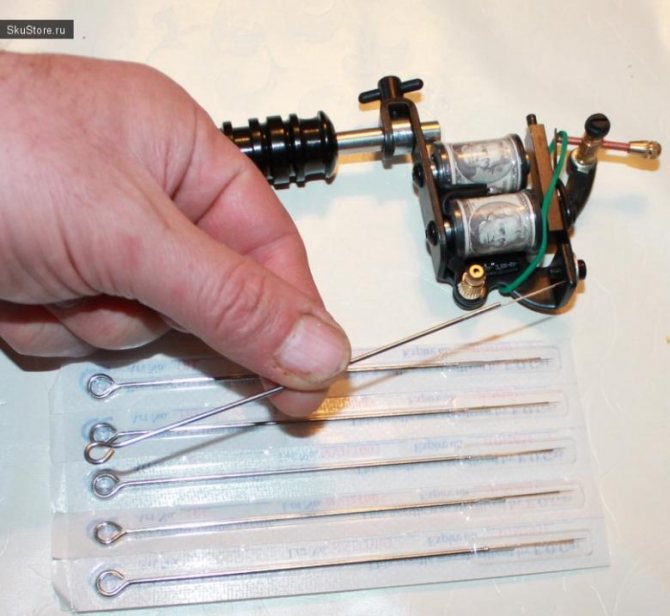
Features of the needle
During the operation it is necessary to ensure the tension of the string to obtain an even image. A thin string from a guitar is cut at the rate of 20 mm longer than the tube, in this case a rod from a pen or pencil. One end is sharpened sharply, and the other end is attached to the motor, close to the axis of the shaft. It is this position of the needle that will ensure the correct range of oscillation, affecting the accuracy of the pattern.
During the procedure, you should not forget about the precautions, providing a sterile environment in the room. Applying a tattoo can damage the skin. It is necessary to avoid touching anything with the string, rod and needle, for which you need to work wearing gloves. After all manipulations the needle and pen will no longer be needed.
Watching the video clip will help not to make mistakes. The soft, silent stroke of the machine allows you to achieve beautiful and smooth lines so that the tattoo looks attractive. You can create many styles in the world of tattooing with this device!
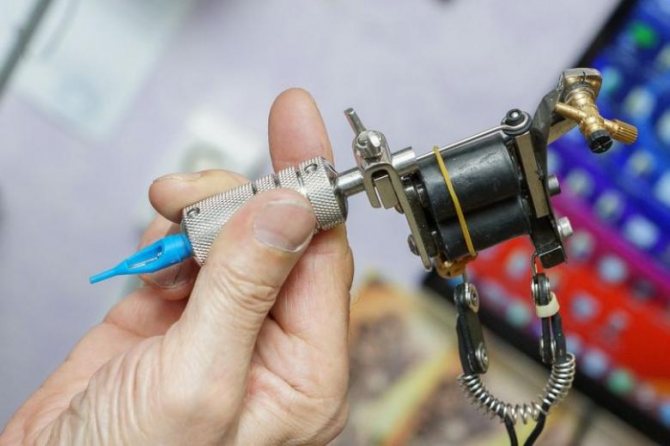
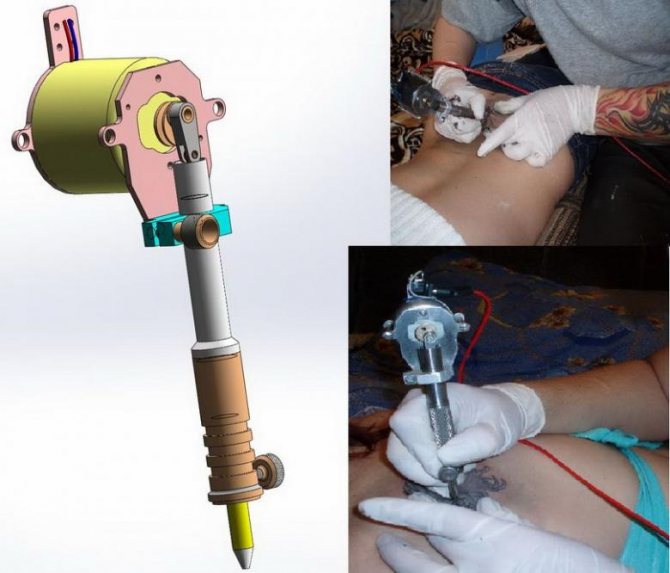
How to assemble and set up?
There is nothing complicated about assembling and connecting the tattoo machine. Let's look at the step-by-step diagram.
- Take the holder, insert the back tube into it, and then insert the handpiece. Both elements are now firmly in place.
- Next, insert the needle into the assembled holder.
- Attach the nipple to the rod leading to the striker.
- Insert the assembled holder into the hole of the tattoo machine and secure it with the tension screw. Do not overtighten the screw so that it does not interfere with needle adjustment.
- The needle bar is secured to the frame with a rubber band to reduce unwanted vibrations.
- Place a disposable bag over the clip cord.
- Turn the machine on, press the foot pedal, and try to play a sound while operating. Turn the screw until you get the desired needle reach.
- Then connect the unit to the power supply and try to turn it on, adjust the hertz and then adjust the tension screw so that the sound is clear during operation.
You can perform operations on replacing capacitors and increasing or decreasing the number of coil turns.
A quick guide to connecting your tattoo machine to the power supply
We can visually see the following on the block diagram:
1. power supply. Alpha and Omega. Giving life to the equipment - may its years be long.
2. Your tattoo machine. Read more about choosing the perfect tool for you in our article here .
3. The pedal that closes the electrical circuit. After the power is fed to the machine through the clip cord.
4. Clip cord. Mostly there are two kinds: "Horned" and "Rca".
5. Pedal wire/wireless pedal adapter, or any kind of plug for the corresponding connector on the unit. Serves to transmit the signal from the "key" or to replace it with an alternative - a button or toggle switch.
6. The power wire of the unit itself. It does not always come with the kit, so watch it carefully. Through it the power block is connected to the mains.
7. The power supply adapter. It is not present on all units and is not needed everywhere. Performs the function of the power supply itself, leaving the point №1 to control the process and display data.
Technological process
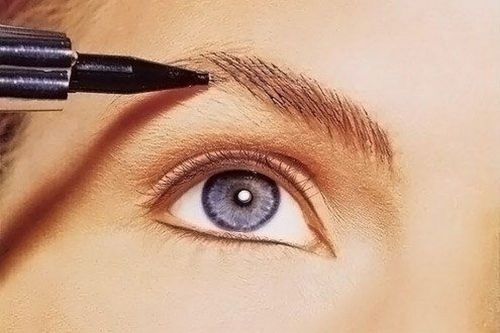
Tattooing eyebrows without a machine possible, but to obtain high-quality and durable results, it is still recommended to use hardware equipment. Reviews of masters claim that the process of tattooing begins with a thorough treatment of the face and eyebrows with soap and antiseptics. Then, the master determines the shape of the future arc. Some manufacturers of equipment for tattooing offer in the set with a machine templates for creating the most popular forms of eyebrows.
Marking the contour is carried out live, without the use of antiseptics. This is an important point, as anesthetic agents in any case give a slight swelling, which negatively affects the beauty of the eyebrows. In most cases, girls can easily tolerate the marking process. If pain relief is required, however, anesthetics are applied over the marking line. In this way, it is possible to achieve penetration of the anesthetics into the punctures of the skin, which contributes to a quick anesthetic effect. After marking, a permanent eyebrow or lip tattoo is done.
Equipment characteristics
Machine for the performance of permanent tattoo includes the following components:
- A power system that serves as a switch of speeds and working orders.
- The system for the foot adjustments.
- A removable module-needle through which the paint is injected into the epidermis.
This is a professional model of equipment, which is used by masters in beauty salons. For home use, you can buy a plastic manipula, functioning on batteries. However, a high-quality result on the lips, with the help of this device is impossible to achieve.
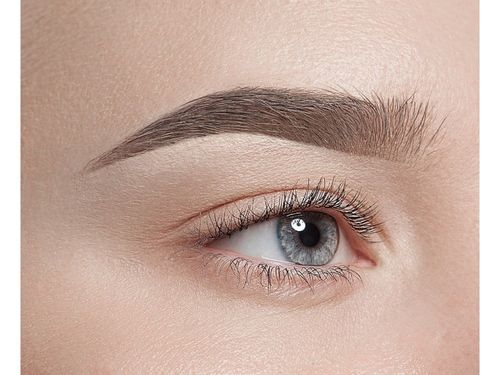
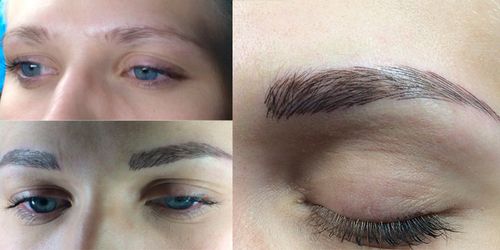
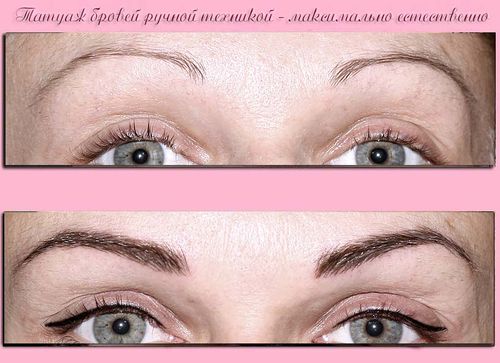
Eyebrow tattooing machine in the photo, turns out beautiful and long-lasting. If the master uses quality equipment, the "smart" mechanism will calculate the necessary speed and force of punctures, which are suitable for this type of skin. To get a beautiful lip permanent, some salons have machines with two or more interchangeable handles, which allow you to use several shades of pigment.