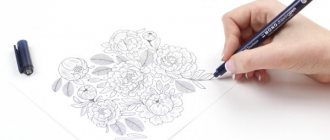
Drawing hands and arms is one of the most difficult, and at the same time the most fascinating learning tasks for beginner artists. Consisting of a huge number of bones, muscles and tendons, human hands and arms have extraordinary plasticity and can take a wide variety of positions.
To begin drawing hands and arms one should study their structure and proportions. Currently there is a large number of books on anatomy, which will help to get acquainted with this issue in detail. And then you can proceed to practical exercises.
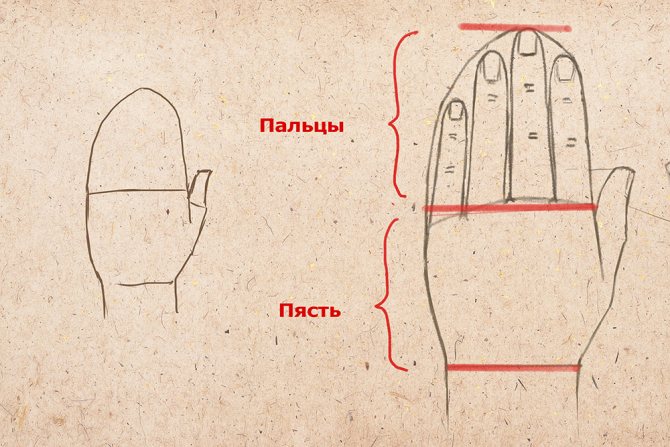
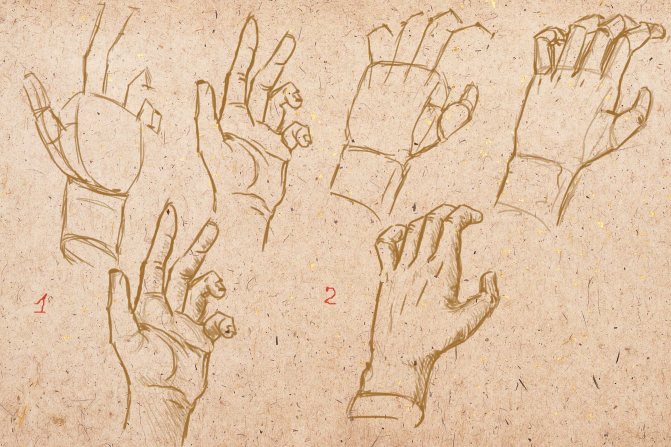
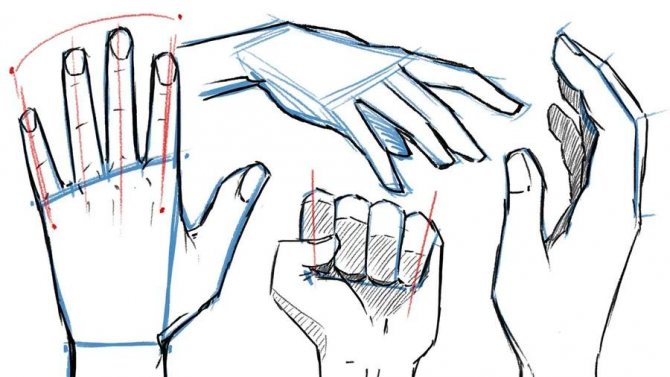
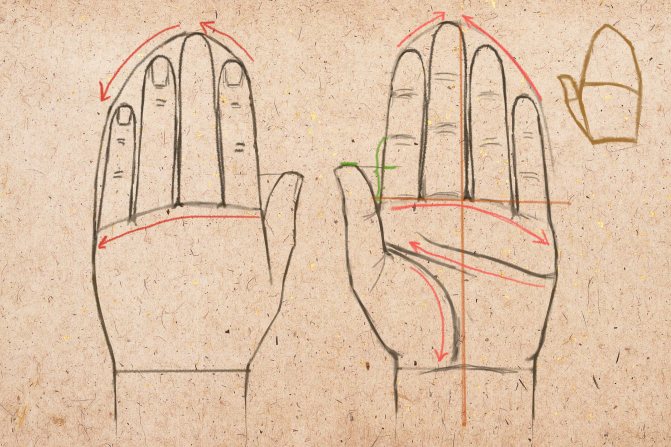
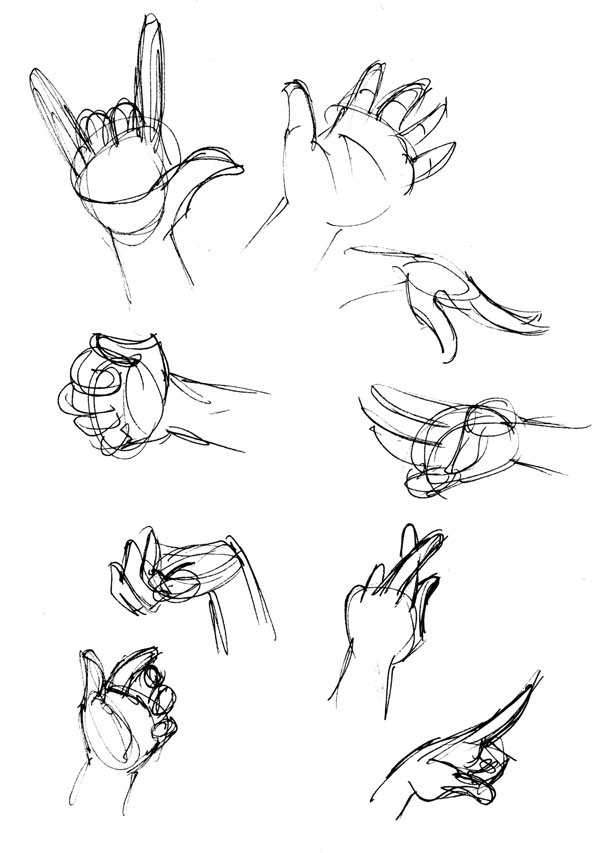
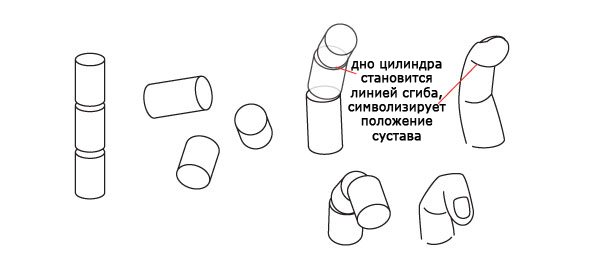
Finding the joints
In fact, there is an invisible line that runs through the middle finger and through the center of the wrist. It must be perpendicular to the horizontal line that crosses the wrist.
At the intersection of the lines, a circle is drawn around which the hand rotates freely.
Depending on the person's hand, the location of the joints on the fingers also varies. However, to imagine where the joints should be located, you can draw two curved lines coming out of the thumb nail. If you add wrinkles in these places, the hands will look very natural.
Complicated angles.
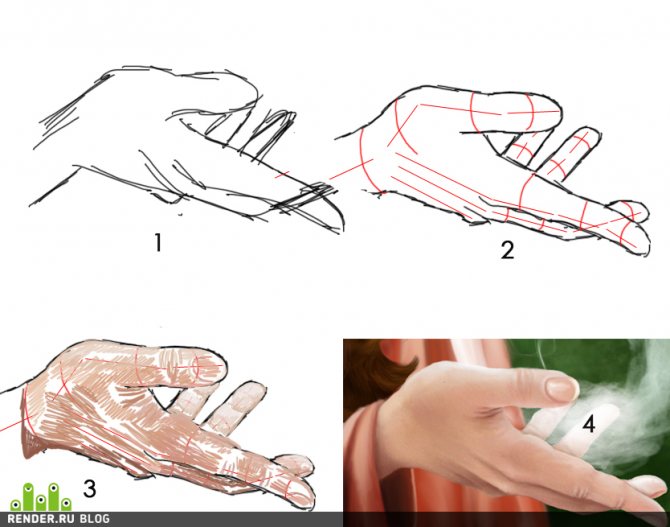
Sometimes artists depict subjects taken only "from the head," rather than those caught up in real life. In some cases, there may be complicated angles of hand and arm positions. To avoid obvious mistakes, you can use the way of drawing brush positions using lines with dots. Each line is the designation of a bone or knuckle, guiding the movement of the element. Each point is the place of connection, bend, the beginning of movement.
Further on these lines you can add simple geometric shapes - cylinders, parallelepipeds, circles. Geometric, schematic representation of people and different parts of the body is a great way to practice drawing movements.
The best way not to go wrong when it comes to drawing complex hand angles is to try these angles on yourself. You can use a mirror or photo timer to refer to the drawing. Thus, a basic knowledge of human anatomy, drawing the order of the composition and hard training will not only help to learn how to draw hands and other complex body parts, but also make the process of drawing more interesting and conscious.
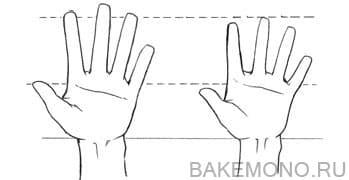
Size and proportions
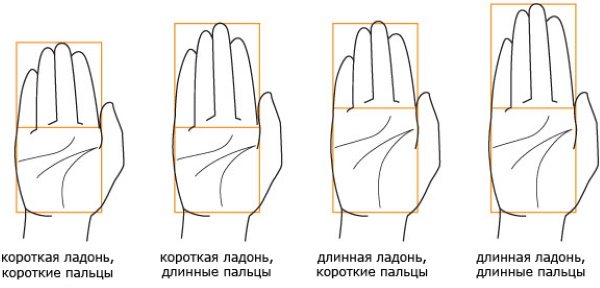
The size and shape of the hand differs from person to person: wide palm, narrow palm, long fingers, short fingers. This list can go on - so there are rules in proportions when drawing a hand.
Basically, the length of the hand is roughly equal to the length of the middle finger doubled.
The middle finger is usually the longest. The index finger and ring finger are about equal, but sometimes the ring finger is longer. The little finger reaches the upper joint of the ring finger.

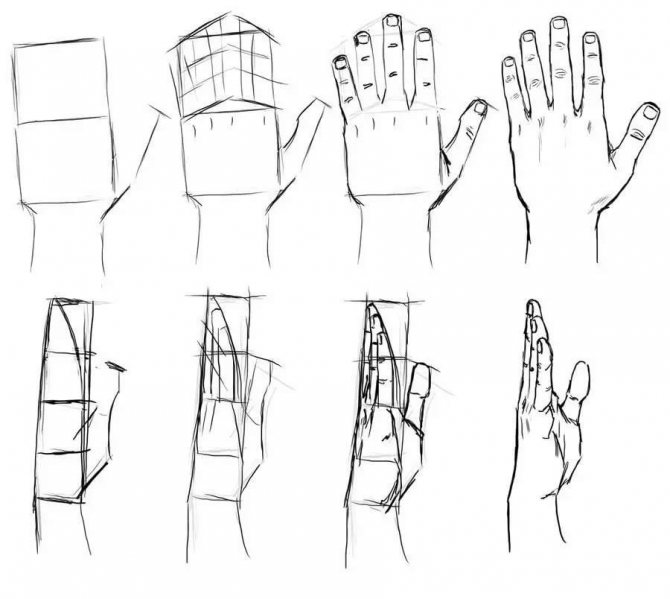
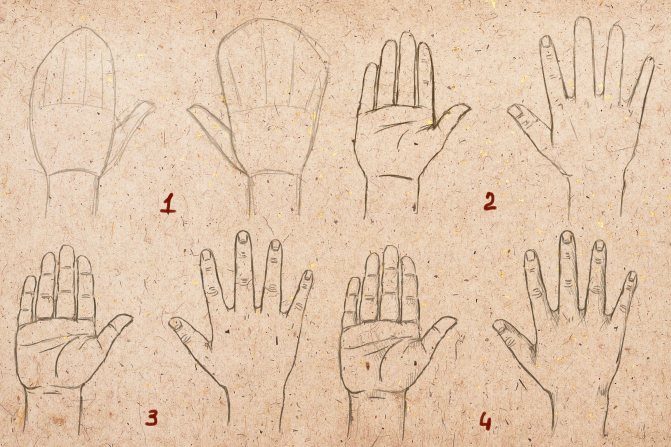
Drawing a hand step by step
Before drawing the hand, decide on the position of the forearm and wrist. Let's start with the simplest example and use your own hand as a model, not a re-drawing of the picture below.
- Lightly outline the shape of the brush. Next, highlight the shape and direction of the thumb, without drawing details. Use lines to show the direction of the other fingers.
- First mark the index finger, then show the shape of the others.
- Detail, showing pads, creases, knuckles, nails, and other details.

- You can use strokes to show shadows, thereby giving the drawing a three-dimensional appearance. Between fingers are connecting membranes of skin, they are especially well noticeable when fingers of hand are separated. These septa are almost always shaded.
- If you have a desire, you can add some color, and, for example, shadows under the hand:
Drawing a person's nose.
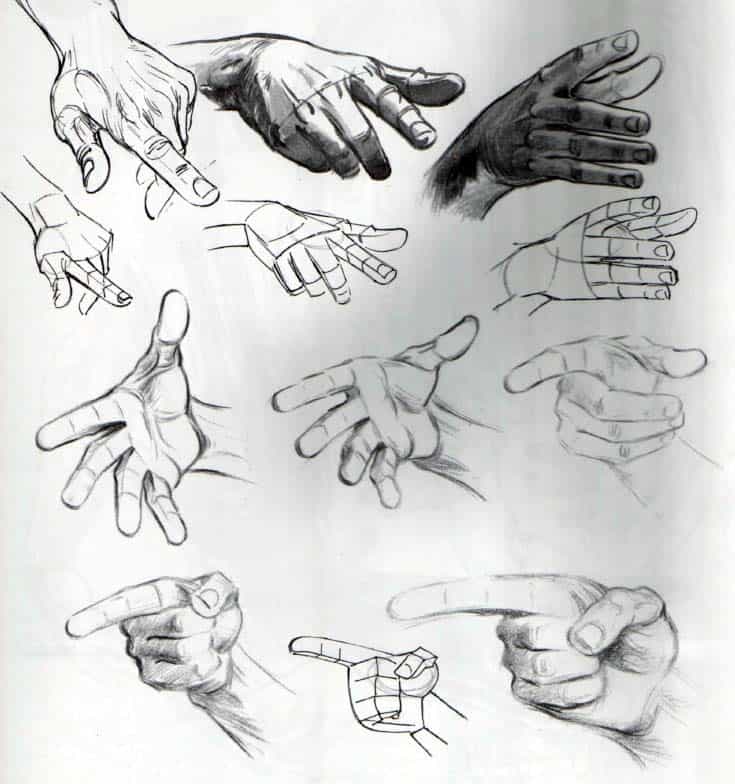
In general, hand drawing is a skill that needs to be constantly developed and improved. Brushes of hands are very plastic and can acquire hundreds of different positions and angles.
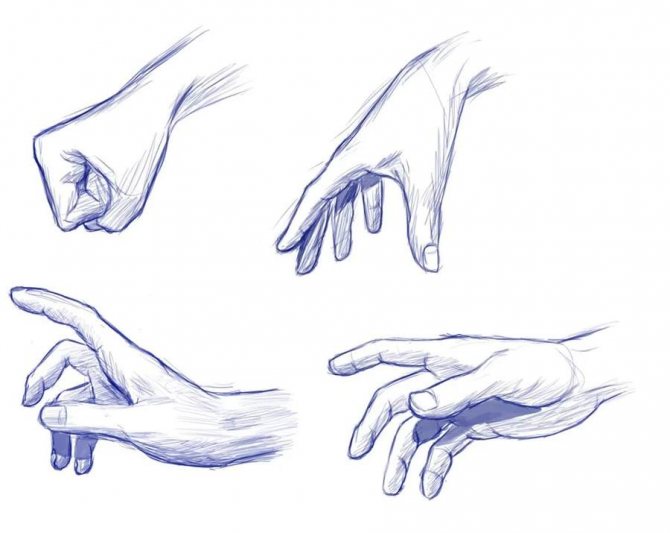
Difficult angles
Interesting angles in which the fingers are in different positions are more difficult to depict. There are several ways to help avoid mistakes.
One of the most effective and most commonly used ways of depicting the hand in a non-standard perspective is to mark the line position of each finger:
Sometimes the line fails and you have to use auxiliary shapes, cylinders or parallelepipeds to indicate the position of the phalanges:
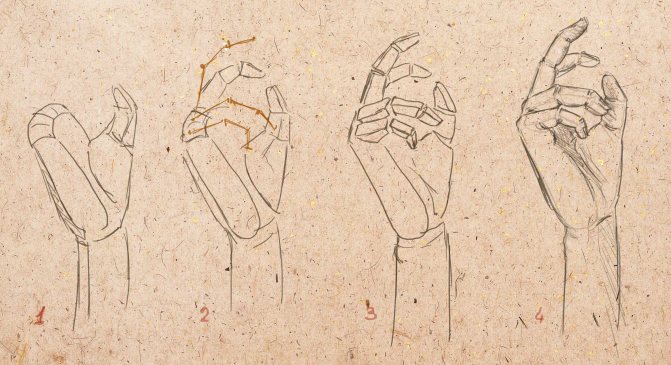
In order to give the brush some intricate position, first try it on yourself, how comfortable, natural and, in general, possible it is. The hand, fingers and each joint are interconnected, changing the position of one element of this structure often changes the position of the others as well.
For example, try bending your little finger so that the hand remains straight. Does it work? I think not. There are many such examples. So think about the position of the hand even before you start drawing.
Men's and women's hands
There is a big difference between a man's hand and a woman's hand. A man's hand looks more masculine by giving it a more angular shape, and more feminine by giving it a soft roundness.
Drawing a hand with nails looks more realistic.
The average nail is about half the length from the tip of the finger to the first joint.
Women's nails are drawn more elongated and rounded, while men's are more square and angular.
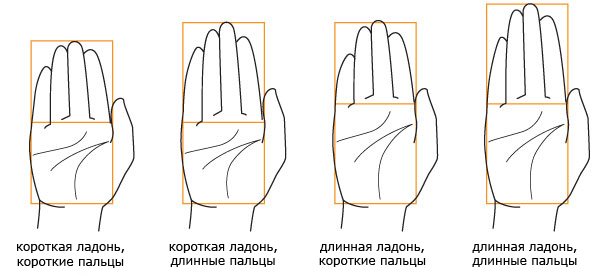
Shapes of hands and fingers
In addition to the fact that the shape of hands differs in men and women in particular, it differs in all people in general. The features are clearly seen in the hands and fingers.
The shape of the hand may be something like this:
- short palm with short fingers;
- short palm with long fingers;
- long palm with short fingers;
- long palm with long fingers.
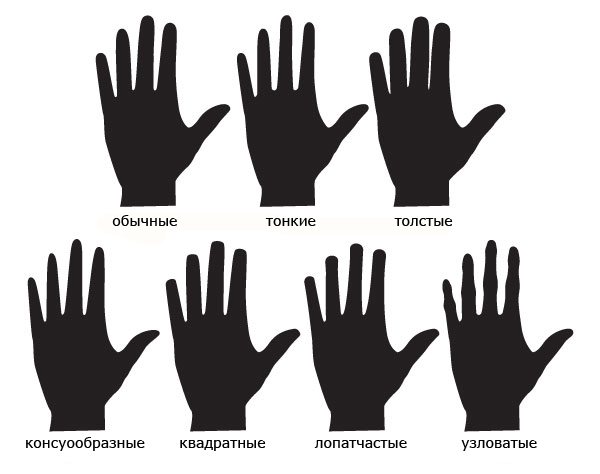
To this is also added the width of the palm - the hand may end up looking long and narrow, that is, more graceful, or it may end up short and wide, like a "paw". Fingers can also have their own characteristics.
For example, they can be depicted:
- Regular, proportional to the entire hand;
- thinner or, on the contrary, thicker;
- with narrowed fingertips, that is, to give them a cone-shaped form;
- with "square" fingertips;
- shovel-shaped, that is, narrower only in the central part;
- knotty, with strongly protruding phalangeal joints.
A set of such features can easily help portray male, female, child, or elderly hands. Some of them can be applied to hint at the character's profession - musician, worker, seamstress or jeweler.
Drawing a fist.
Draw a circle that will correspond to the basic shape of the fist. Then add the lines of the thumb and wrist.
If you have trouble imagining where the thumb will be, just squeeze your hand into a fist and examine the position more closely.
The back and top of the hand don't move, so you just need to pay attention to how the fingers are connected. Mark out the top of the hand and the four fingers, usually the same width.
Next, make all the lines soft and smooth.
As for the shadow, you can add it to create more realistic depth.
However, how much detail you draw the hand is up to you. Find your style that works best for you!


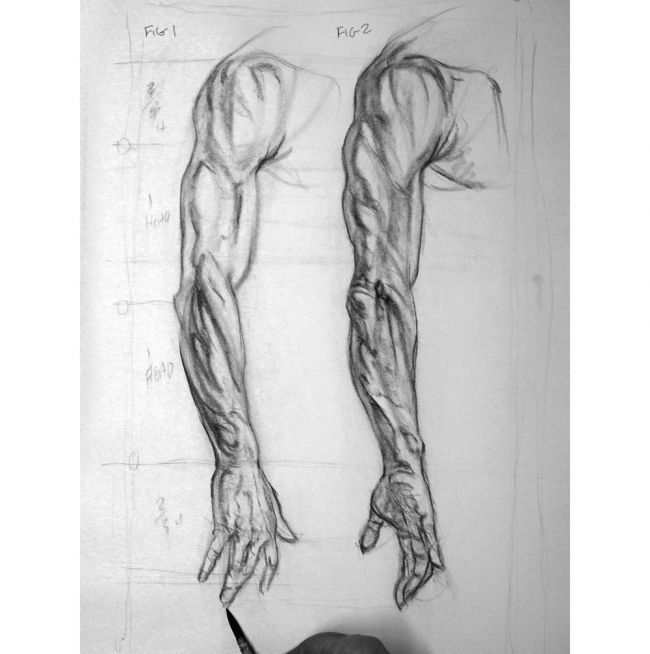
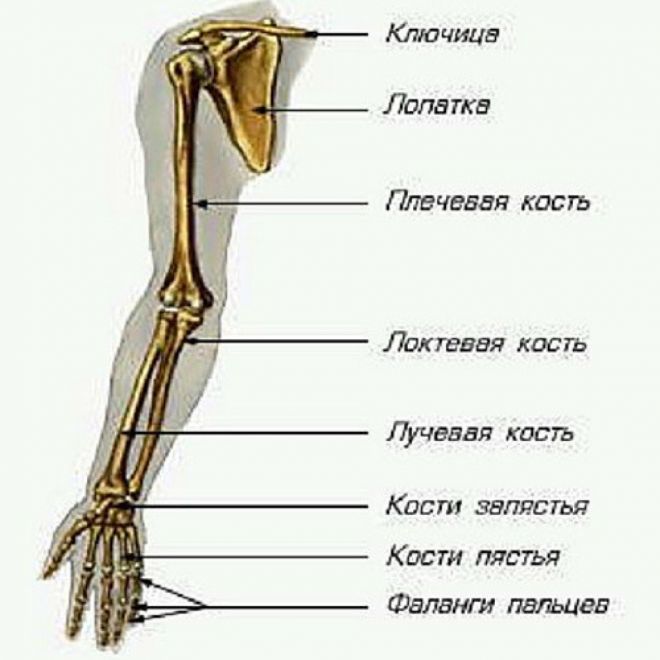
The anatomy of the hand when drawing
Every artist should know anatomy, or at least the basics of it. This rule applies not only to those who draw realistic style real animals and people, but also to fiction artists. Any body consists of a skeleton, muscles, tendons, veins and vessels, skin, and has its own unique proportions. To learn how to draw hands, it is important to understand the structure of this part of the body, not only for the sake of proportionality, but also to achieve authenticity in the movements.
The human hand consists of 3 main parts:
- The shoulder - Anatomically, it's the upper part of the arm, ending with the elbow.
- forearm - the part of the arm that goes from the elbow to the hand.
- hand - The palm, the fingers, starting from the wrist.
When drawing the hand in its entirety, it is important to understand the relationship between the bones and, in particular, the muscles and tendons of these parts. Acting with fingers, a person tenses forearm muscles, and flexing the arm at the elbow - tenses both shoulder and forearm muscles. Such nuances greatly affect the authenticity of the drawing.
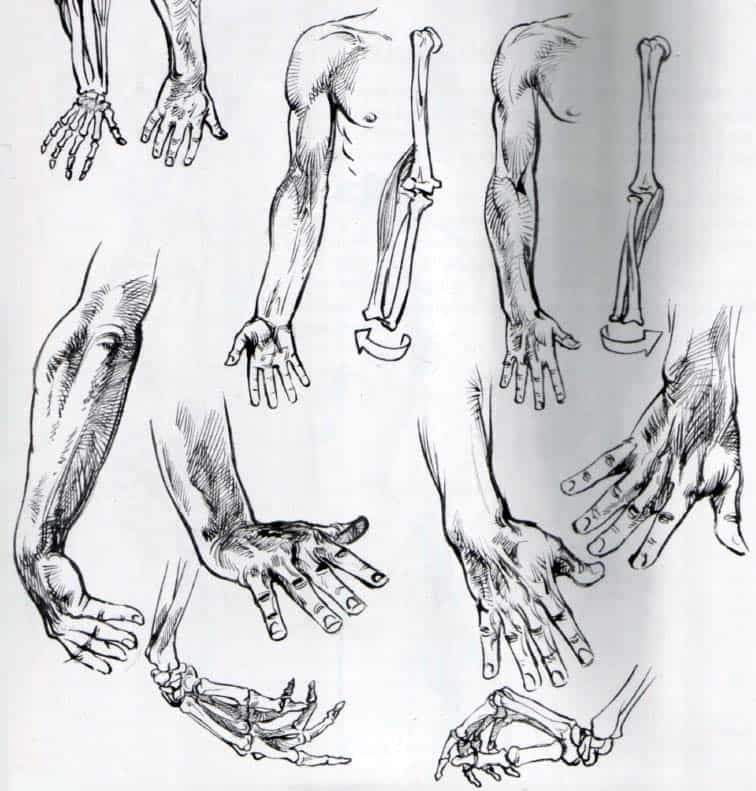
The bone and muscle structure of the shoulder
The shoulder consists of one bone, the humerus. It has the head of the shoulder attached to the shoulder joint, so the bone has an extension in the upper part. From below, at the junction with the elbow joint, this bone also thickens.
| Muscles of the upper arm | |
| The deltoid | It is this muscle that is "popularly" called the shoulder. It is responsible for the movement of the entire arm, raising it, lowering it, and withdrawing it to the sides. |
| Biceps | Another name is the biceps muscle of the shoulder. It is located at the front (relative to the inside of the palm) and is responsible for bending the arm at the elbow. |
| Triceps | The triceps is also called the triceps brachii muscle. It is located on the other side of the biceps, that is, at the back (relative to the back of the palm). The function of this muscle is to extend the arm at the elbow. |
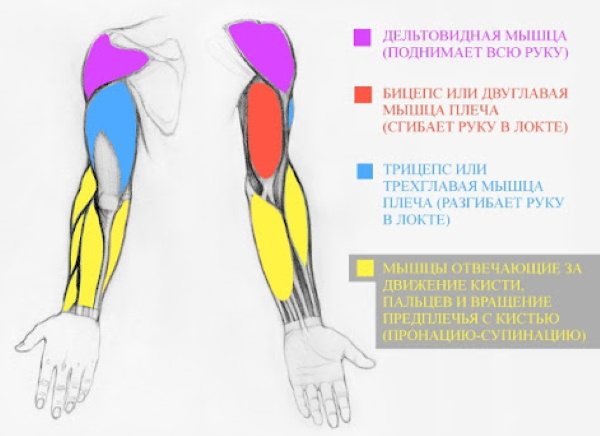
The tendon-muscular connections in this part of the arm are attached to the joints of the shoulder and elbow as well as to the whole bone. Their function is to transfer tension from the muscle during contraction and to perform flexion and extension at the joints of the arm.
Features of the elbow joint
The shoulder is connected to the forearm by the elbow joint. The joint is shaped like a ball and cup - the radius in this part rotates around the ulna, and vice versa, which allows the arm to bend in this place. The joint itself is not visible on the hand. Anatomically, a large number of tendons and muscle ligaments can be seen here.
There are 3 key points of the elbow that stand out on the outside:
- outer condyle;
- inner condyle;
- The head of the ulna.
The head of the elbow bone and the inner condyle are visible in every position of the arm. When the arm bends, the outer condyle is also visible (this element "goes" into the fossa of the elbow when the arm is straight). The anatomy of the hand for drawing is important in such nuances as the different positions of the hand, the whole hand. It helps to express not only a person's pose, but also his desire for movement, tension.
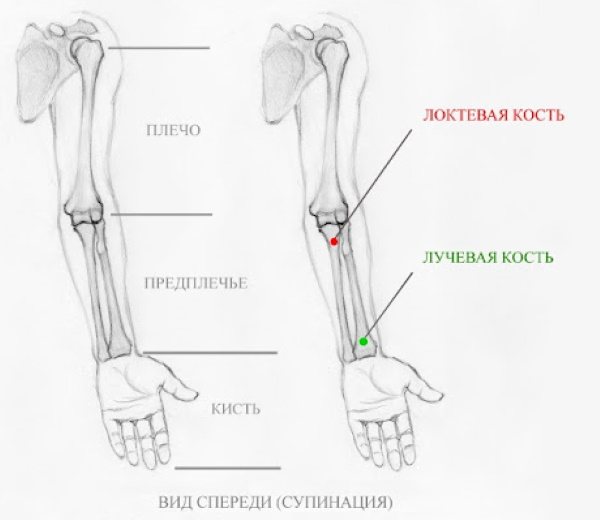
The structure of the human forearm
The forearm is based on 2 bones located parallel to each other - the ulna and the radius. The first of them has a noticeable thickening at the elbow, the second thickens closer to the wrist.
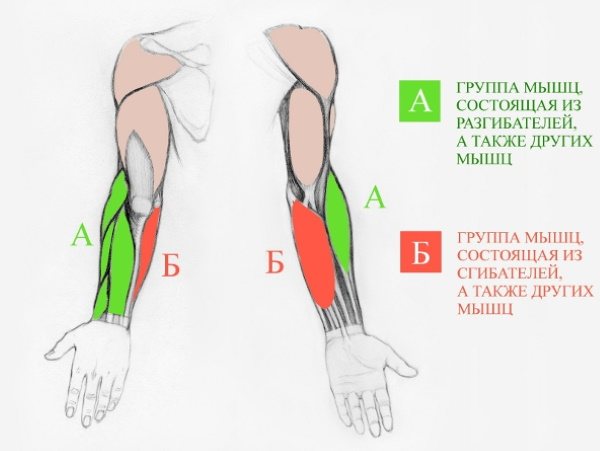
Two groups of muscles can be distinguished in this part of the hand:
- Those responsible mainly for extending the wrist and fingers - located conventionally on the side of the thumb of the hand, occupy most of the forearm;
- The muscles mainly responsible for flexion of the wrist and fingers are on the side of the little finger.
The part of the forearm that is connected to the elbow joint is somewhat thicker than the part that goes into the hand. The tendons here accumulate mainly in the wrist area, and this is the reason for the different thickness of the forearm.
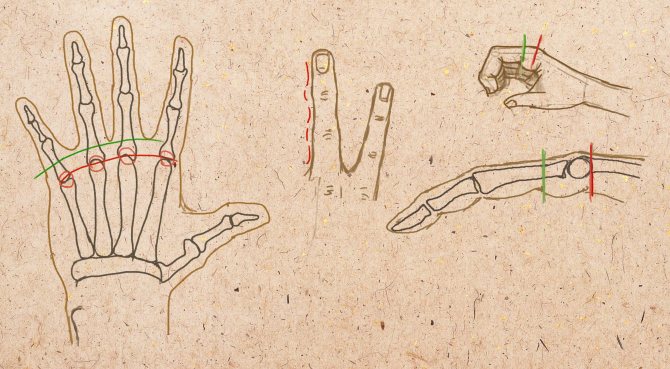
Features of the structure of the hand
The anatomy of the hand to draw the hand is the important part that all novice artists dread. Here is the largest number of bones, muscles, tendons and the most complex relationship between them.
To begin with, it's worth sorting out the bones:
- there are eight bones in the wrist;
- The carpal bones are connected to the carpal bones by the 5 metacarpal bones;
- From them come the phalanges of the fingers, 3 each on the index, middle, ring, and little finger, as well as 2 on the thumb (a total of 14 phalanges).
The phalanges have their own names. Those connecting to the metacarpal bones are called proximal phalanges. Next come the middle phalanges and then the distal or nail phalanges. You have to learn to distinguish them from each other - it's important to keep the right proportions.
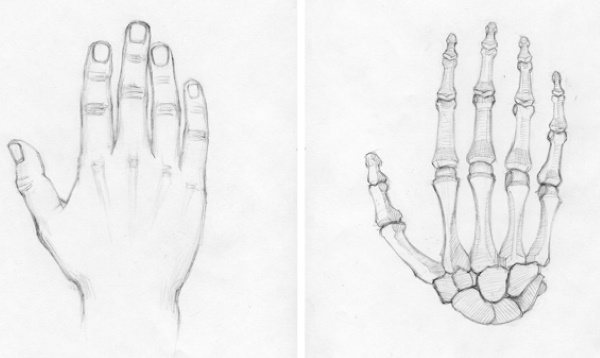
The anatomy of the hands for drawing - in the photo brush with its bones.
Between the bones of the hand there are muscles. There are fewer of them here than tendons, so you can feel the bones and often the tendons themselves on the hands. All tendons tend to tend to the tip of the fingers, allowing movement of the hand and fingers. In the area of the wrist are the strengthening transverse tissues, which ensure that the tendons of the flexor muscles are held in place.
Main muscles of the wrist:
- The muscle opposing the thumb;
- the muscle that leads the thumb;
- worm muscles;
- The muscles of the little finger - flexor, oppositional, withdrawal;
- the short palm muscle.
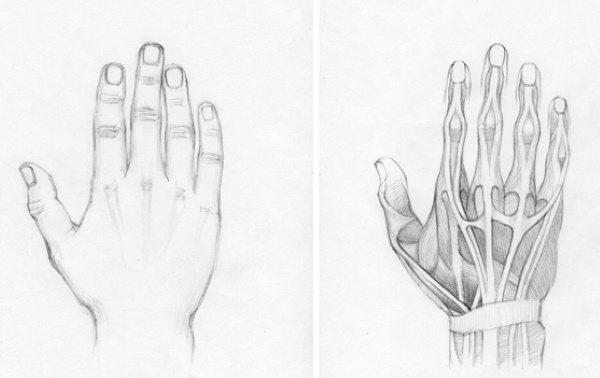
To understand the location of these muscles and tendons, their relationship, is much easier with the example of your own hand. Left hand for training can be drawn and from nature, observing the movement of fingers, their flexion, tension.

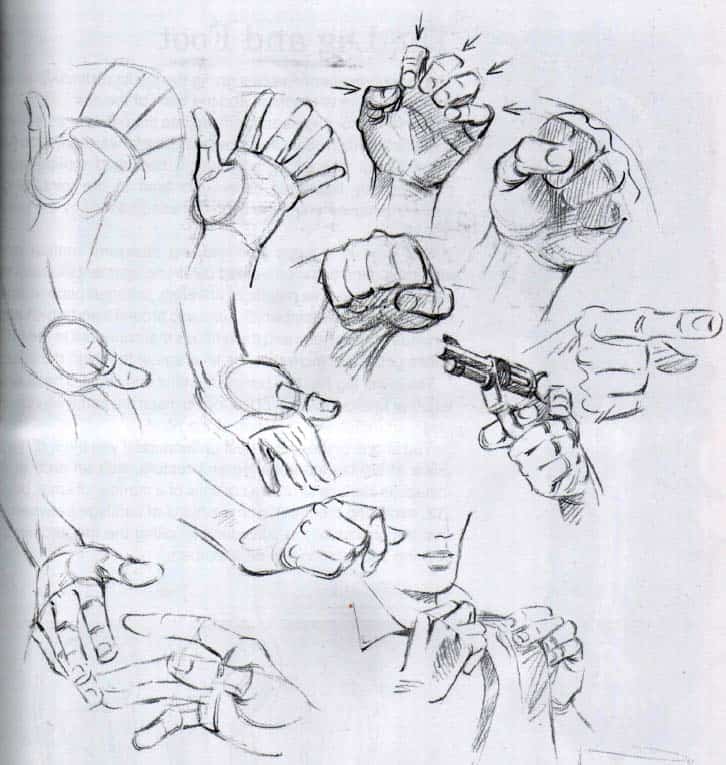
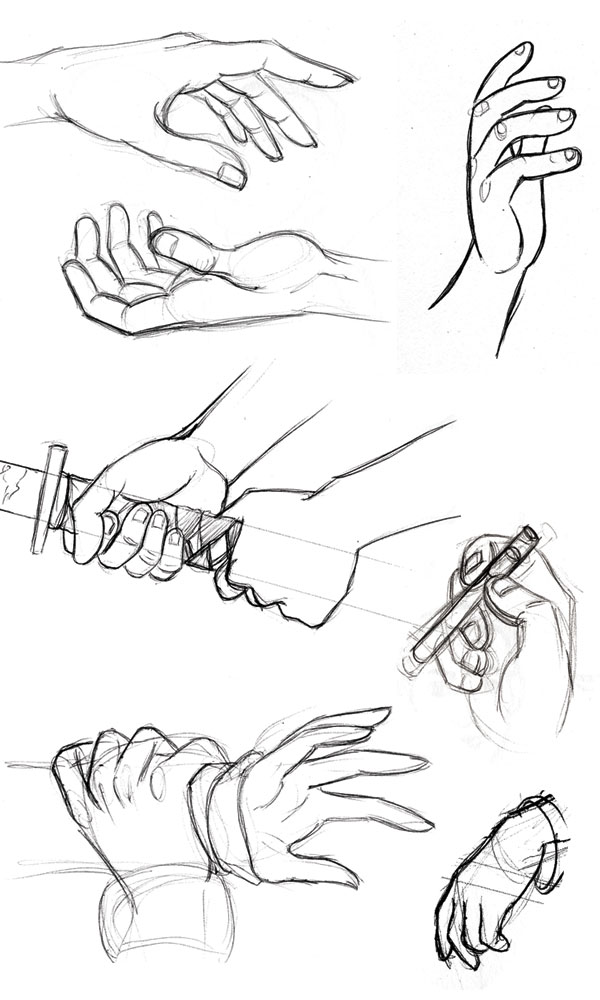
Different variants of drawing fist
This drawing shows a hand clenched into a fist from the outside. The index finger is much higher than the rest.
In this drawing, three fingers are pressed against the palm, the thumb is moved away, and the index finger points to a point.
Note that with the shadows and wrinkles, the index finger looks three-dimensional. The same applies to the fist, despite the fact that the three fingers are drawn only some phalanges, creates the effect of volume.
This picture shows a hand clenched into a fist from the inside. The index finger is also higher than the rest.
There are different ways to place wrinkles and shadows in order to create a fist volume effect.
Range of motion
Human limbs have a wide range of movement. This is especially true of the hands. And in order to draw people in motion, to portray various life plots, it is necessary to understand this issue.
The range of motion in the shoulder joint
The human shoulder joint has a huge range of motion in different directions. The first movement to examine the issue is raising and lowering the arm up and down (resting state). Here the deviation will reach 170-180° from the resting state. The arms extended forward will reach an angle of 90°. In addition to moving up and forward, you can also move your arm backward. Here the deviation range is about 40°.
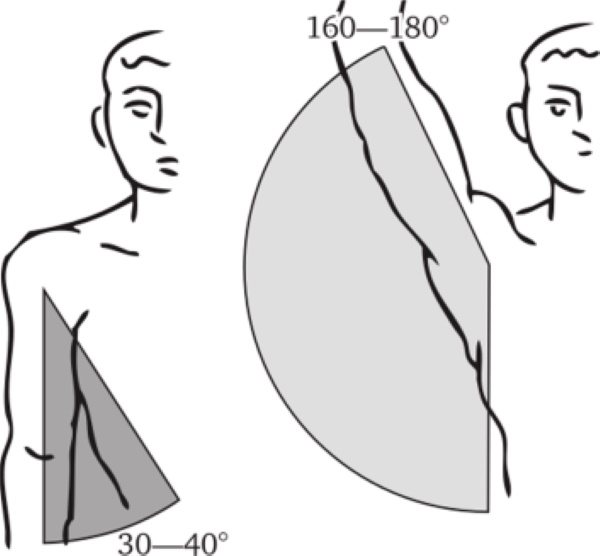
You can raise your arm 90° and move it straight out to the side. From this position, the arm will be 40-50° to the back, and 140-160° to the front. From the same position, you can raise your arm vertically upwards and lower it down at an angle of about 30-40° in the opposite direction.
Don't forget that you can put your arm fully behind your back at a straight angle at the elbow, and at an angle of 30-40° when the arm is straight.
Range of motion of the wrist
There are such concepts as hand pronation and supination. If you take the thumb position as a neutral position, then Pronation is when the hand is turned outward with the back of the hand, and Supination is when the hand is turned upward with the palm open. So, the range of motion of the hand alone is 180 degrees. But if you also involve the elbow and shoulder joints, you can rotate your arm 360°.
Movement of the fingers is worth considering, starting with the thumb. Its center of movement is very close to the wrist, which is much lower than that of the other fingers. Therefore, it moves as if separately from them. When the hand is relaxed, there is a small space between the thumb and the palm. This finger can be bent to the base of the pinky finger and moved away from the palm at an angle of up to 90-100° in different directions.
The rest of the fingers are more tightly bound together, and therefore the movement of individual fingers most often provokes the movement of neighboring fingers. These four fingers can be spread apart, bent at the junction of the phalanges, pressed against the palm and brought back a short distance (maximum 90° if pressure is applied to them).
Working on anatomy
Use the tips below to measure the length of your hand (Image courtesy of Patrick Jones)
Here I take the opportunity to draw some marks, a luxury that I don't always have time for in my drawing class. Three and one-third of the head should fit from shoulder to fingertips. I use this formula to figure out how long the arm should be. I also compare the bottom of my nose to the top of my head before doing this.
Fingers
The movable and flexible fingers are made up of joints. The bones of the metacarpal are the largest and longest to which the finger joints are attached. Each successive phalanx is smaller and thinner than the previous one. The hands of our hands are arranged according to the principle of the golden ratio, that is why women's hands are so attracted to the eyes of the surrounding men. The proportions of the phalanges are in the ratio of 2/3 of the length of the previous phalanx.
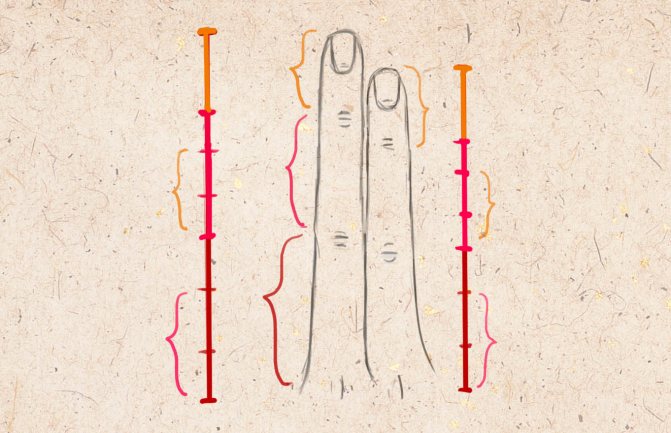
Figure #2. The proportions of the phalanges of the fingers
The following figure below shows: the first phalanx in red, the second phalanx in orange, and the third phalanx in yellow:
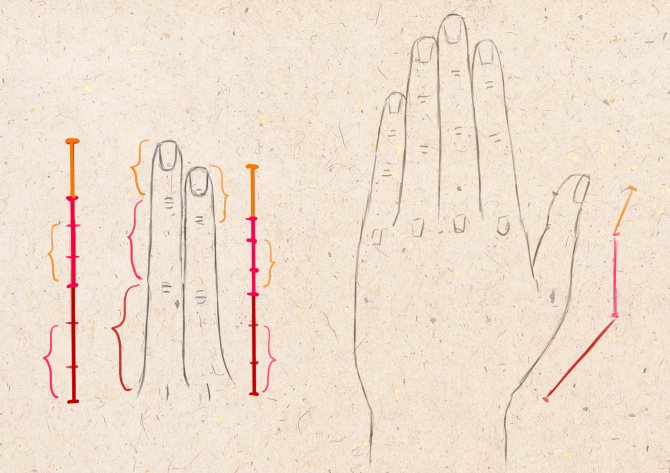
Figure #3. Phalanges of the fingers
All fingers except the thumb consist of four joints: three phalanges and one joint in the metacarpal. The thumb is set to the side, slightly turned in relation to the rest of the fingers, and consists of three joints. Its length usually reaches the middle of the first phalanx of the index finger.
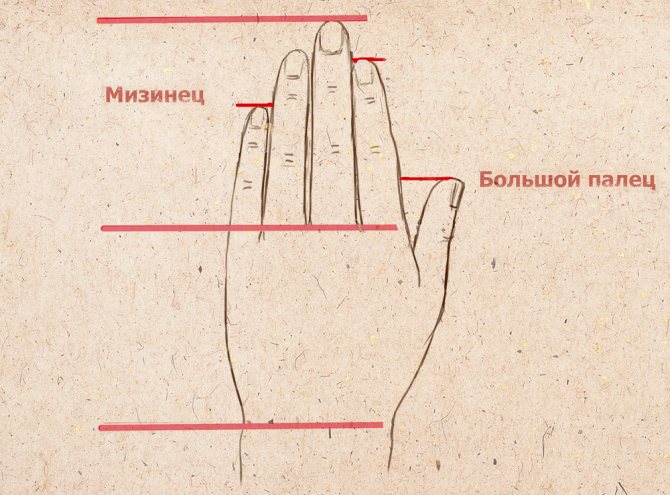
Figure #4. Schematic drawing of a hand
Length of the little finger almost reaches the bend of the last phalanx of the ring finger. This is shown in the illustration above.
Notice the magic of the movement.

The bones twist and pull the muscles behind them (Image courtesy of Patrick Jones)
Here are the bones that are under the muscles. The white dots indicate where they protrude on the surface of the arm. The main thing to pay attention to is the nature of the radial bone's extension. How much the muscle pulls when you rotate, and how the location of the thumb affects this.
A simple exercise
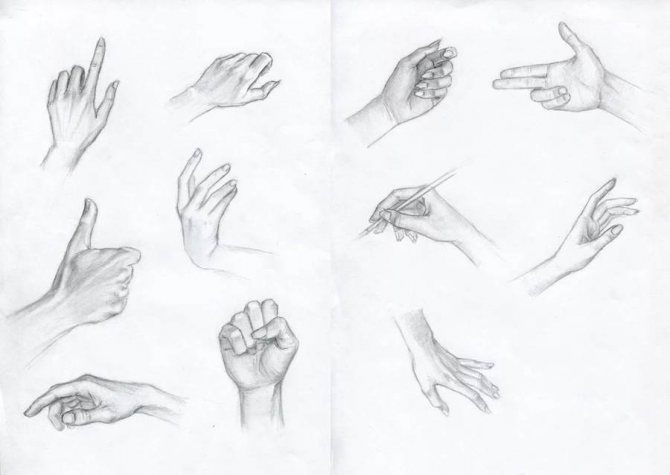
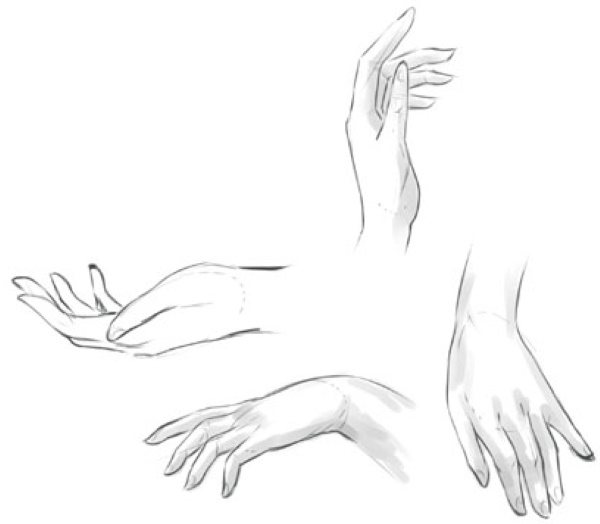
Take a look at your hands - yours and the people around you. How are the thumbs arranged? How do their lines change with different gestures? What do men's hands look like compared to women's hands? How are your grandmother's hands different from yours? Can you recognize your friends by their hands? Make lots of quick sketches of hands that you've seen in life or that interest you in photos and videos. Don't worry about proportions, just catch their expression.
Draw your own hands in different positions, with a mirror, from different angles, always start with the simplest shapes. You can also make vigorous sketches and then finish drawing the details. Don't chase detail, look for broad, simple shapes.
Think through the drawing.
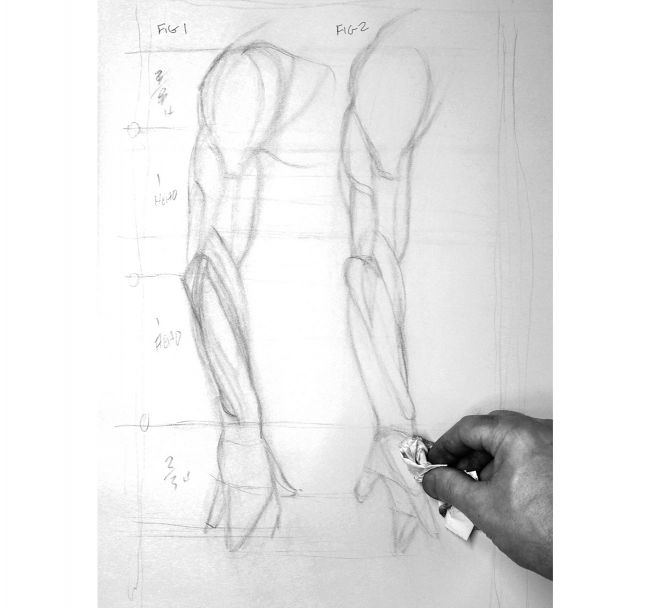
Base your decisions on your knowledge of anatomy (Image courtesy of Patrick Jones)
Always base your decisions on your knowledge of anatomy. When the initial sketch is ready, I wipe the outlines with a cloth, thereby making the lines softer and smoother. The sketch is less clear now, and this will help later when adding tones and more complex lines. To draw the arm the right length and size, make proportional marks based on the size of the head
Arm bones as part of the human skeleton
The skeleton is the basis and support for any part of the body. In turn, a bone is an organ with a certain structure, consisting of several tissues and performing a certain function.
Each individual bone (including the bone of the human hand) has:
- a unique origin;
- developmental cycle;
- structure.
Most importantly, each bone occupies a strictly defined place in the human body.
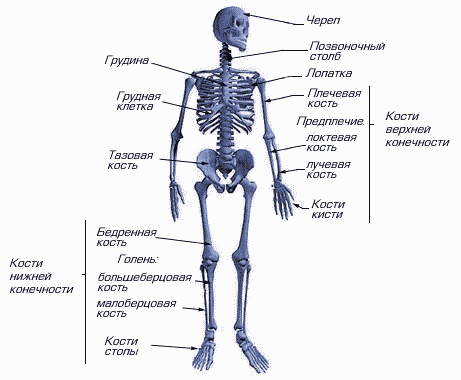
Structure of the human skeleton
Bones in the body perform a large number of functions, such as:
- Supporting;
- blood-forming;
- Protective.
Anatomical Parts of the Hand
The entire arm as a whole includes the following divisions.
The shoulder girdle, which consists of parts:
- The shoulder blade is. A predominantly flat triangular-shaped bone that provides articulation of the clavicle and shoulder.
- The clavicle – bone, which has a "tube" shape, made in S-shape, connecting the sternum and scapula.
The shoulder proper, which includes the humerus, a long tubular bone that serves as the bony base of the shoulder.
The forearm, which includes the bones:
- The radius - The paired bone of such a part as the forearm, resembling a trihedron.
- Elbow - The ulna is a mating bone located on the inner part of the forearm.
The hand has bones in it:
- The wrist.
- The metacarpal.
Structure of the hand
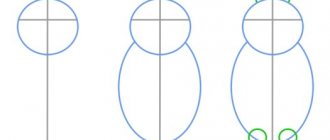
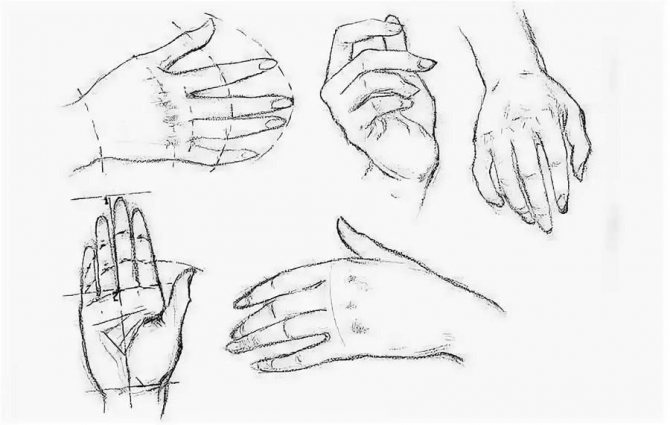
Break it down into figures.
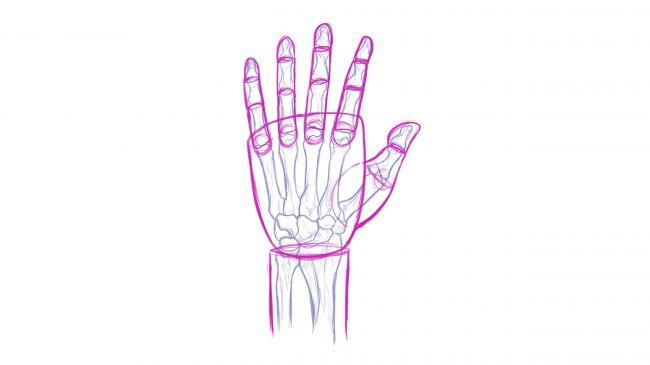
Simplifying the figure will help you understand how to do all of this.
Let's use the drawing above to figure it out. Divide the hand into shapes is more convenient to the drawing of the skeleton, and the palm indicate a rounded trapezoid, fingers with rectangles, and finger tips drop circles.
So you will cease to be guided by some "beautiful hands", and be able to build a three-dimensional version of the real hands.
Hand basics
Here's an express construction of a hand (picture at left). The eight bones of the wrist are in blue, the five metacarpal bones are in purple, and the fourteen phalanges are in pink. Since, at this stage of human evolution, half of the bones mentioned are immobile, you can simplify the diagram (Fig. right) - this is all you should remember for now.
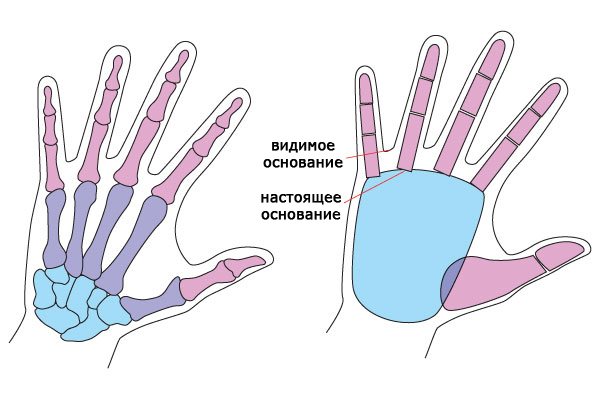
It should be noted that the actual bottom line between the fingers, the joint that attaches to the knuckles, is much lower than the skin fold that covers it. This is a very important point, to which we will return.
Based on the above, the easiest way to begin drawing the hand is to draw the palm. The palm should be shaped like a round, rectangular or trapezoidal steak with rounded corners, to which the fingers will be attached.
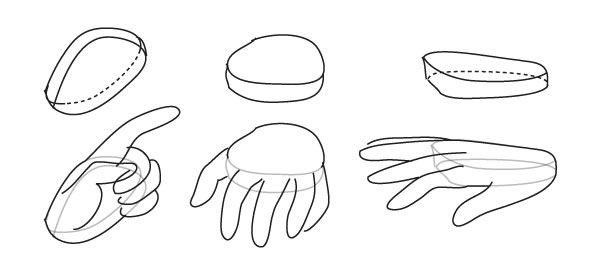
If you have problems exactly with drawing fingers, imagine them as a succession of cylinders. This simple shape will help you draw the fingers at any angle. Look at the figure: the edges of the cylinders become fold lines, the points where the joints are located.
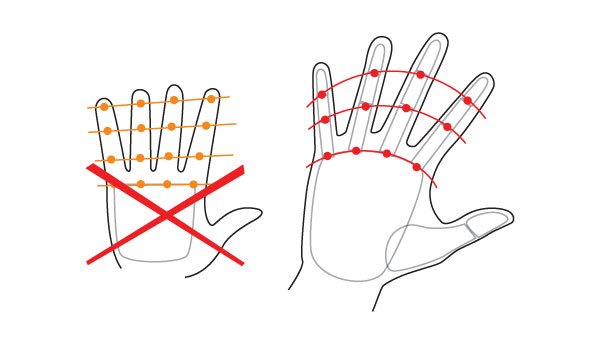
Here's what else is important: the parallel joints are not arranged in straight lines, but rather in arcs.
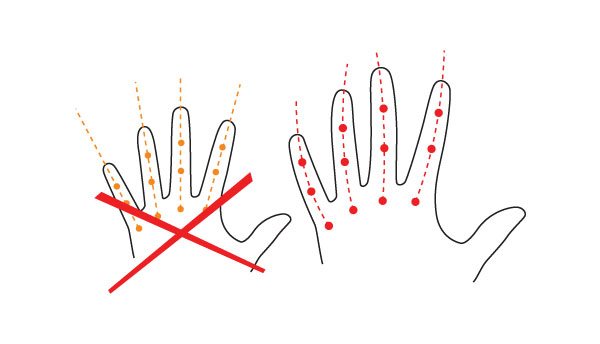
In addition, the fingers are also not straight, but tilted slightly toward the space between P3 and P4. By following this knowledge just a little bit, you will already give the hand a natural look.
Let's not forget the nails either. There is no need to paint them all the time, only when the hand in the drawing is close to the viewer and needs this kind of detail. Here's what you need to know about nails:
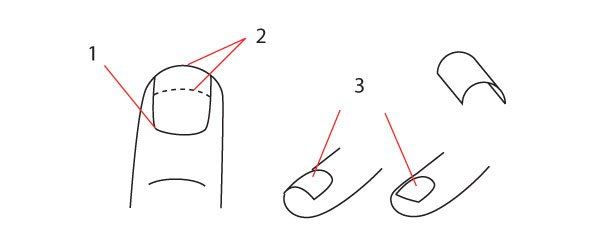
- The nail begins in the middle of the upper phalanx of the finger.
- The line where the nail separates from the skin varies from person to person. If the line is quite low (dotted line), the nails will appear small and wide.
- The nails are not flat. Their actual shape resembles shingles, with varying degrees of curvature on each finger.
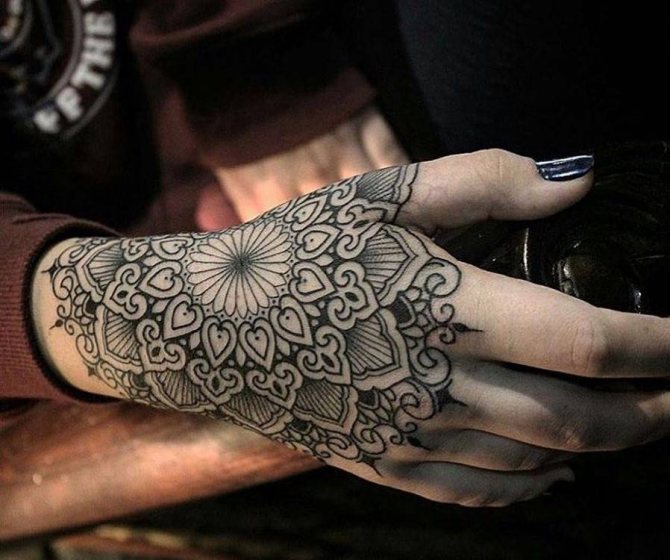
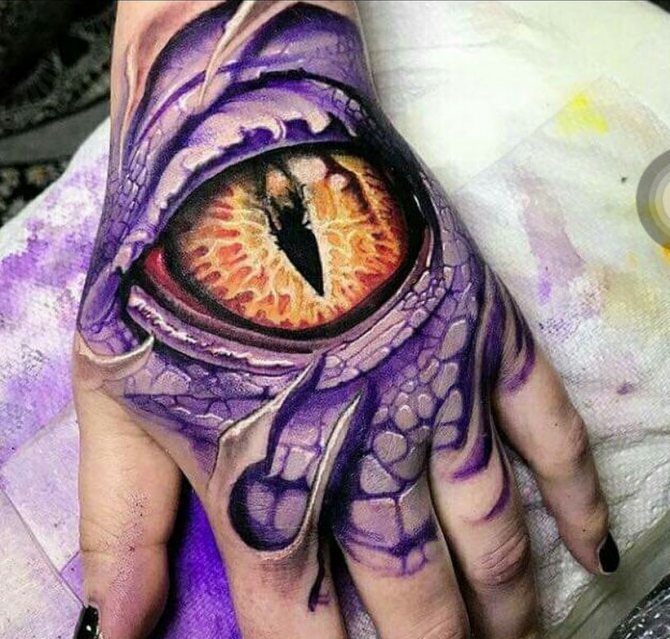
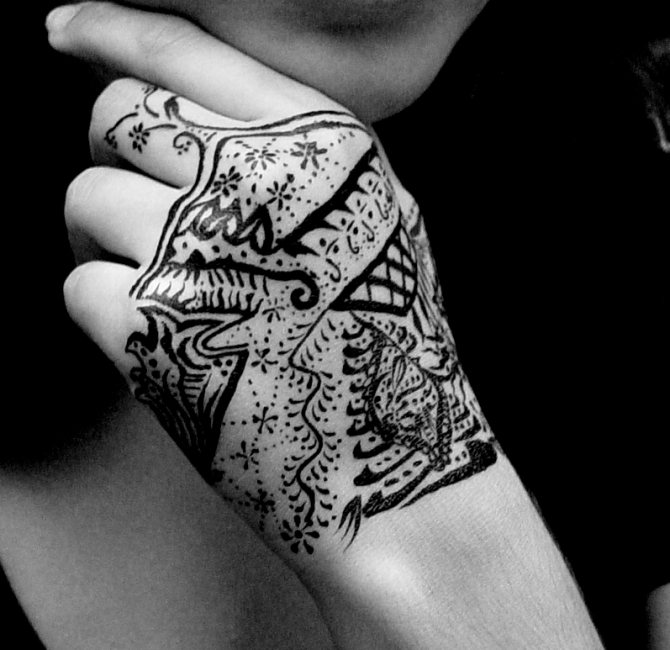
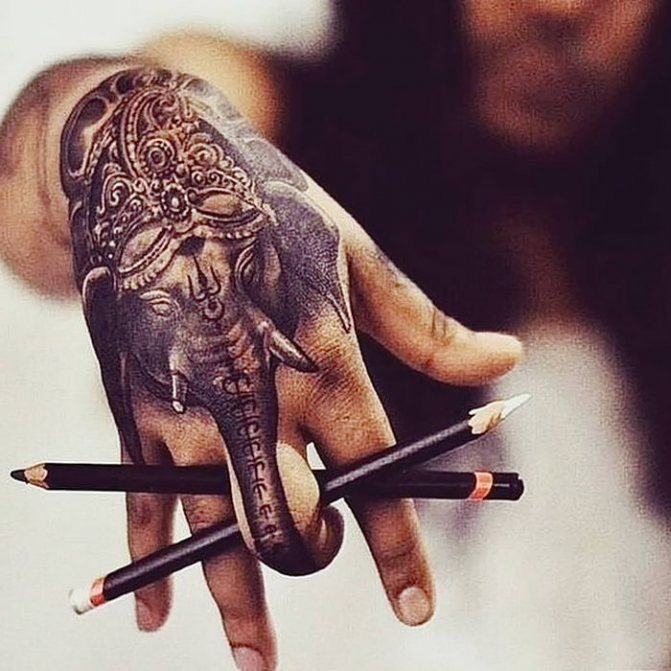
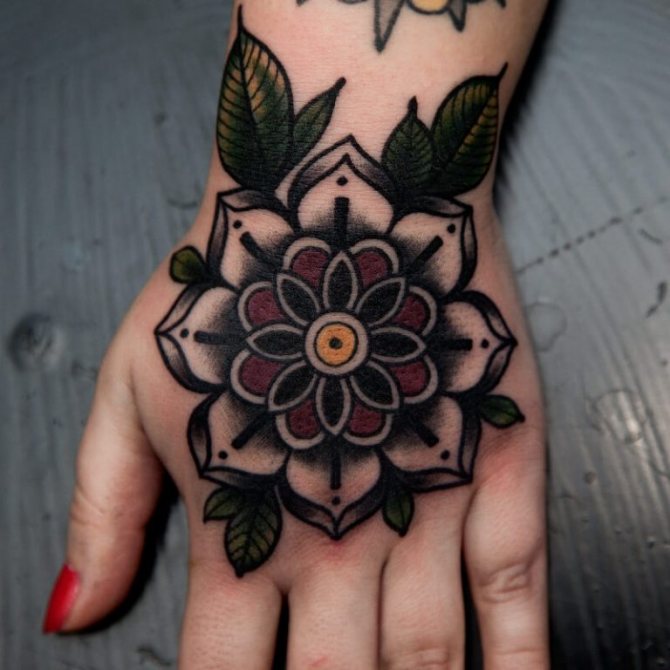
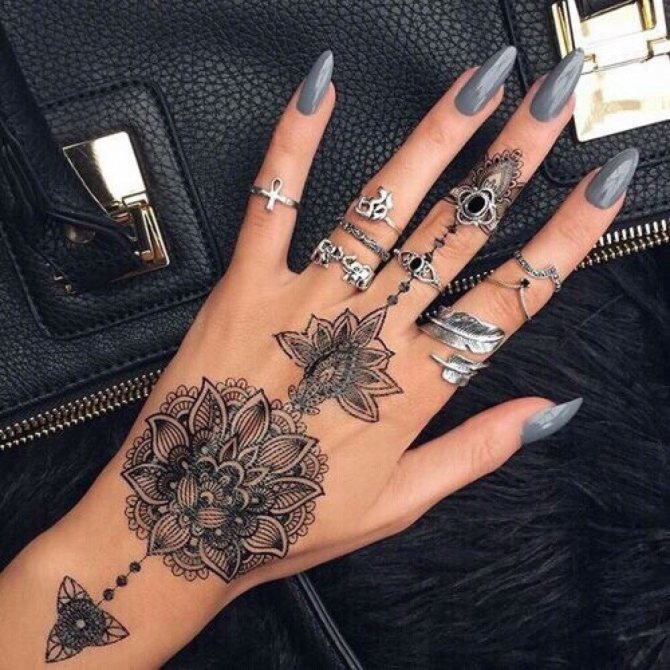
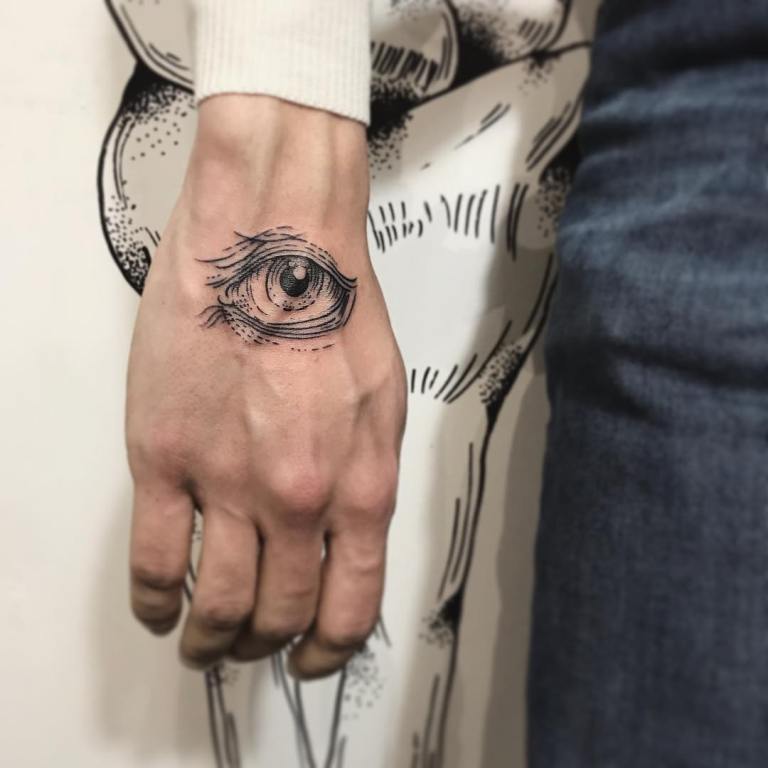
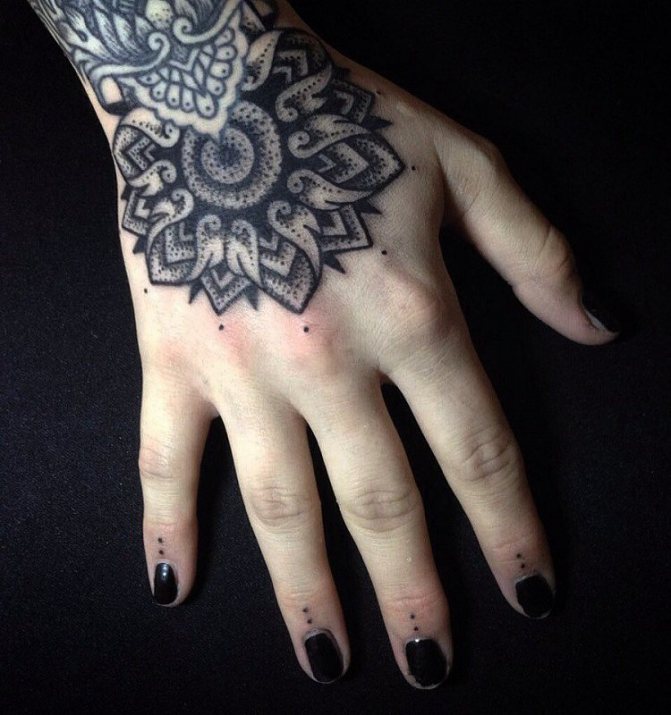
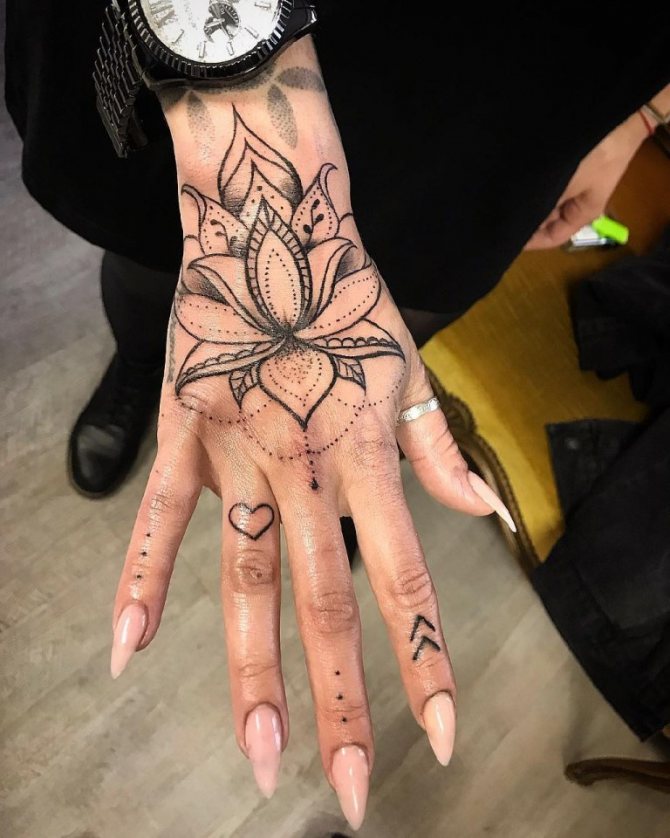
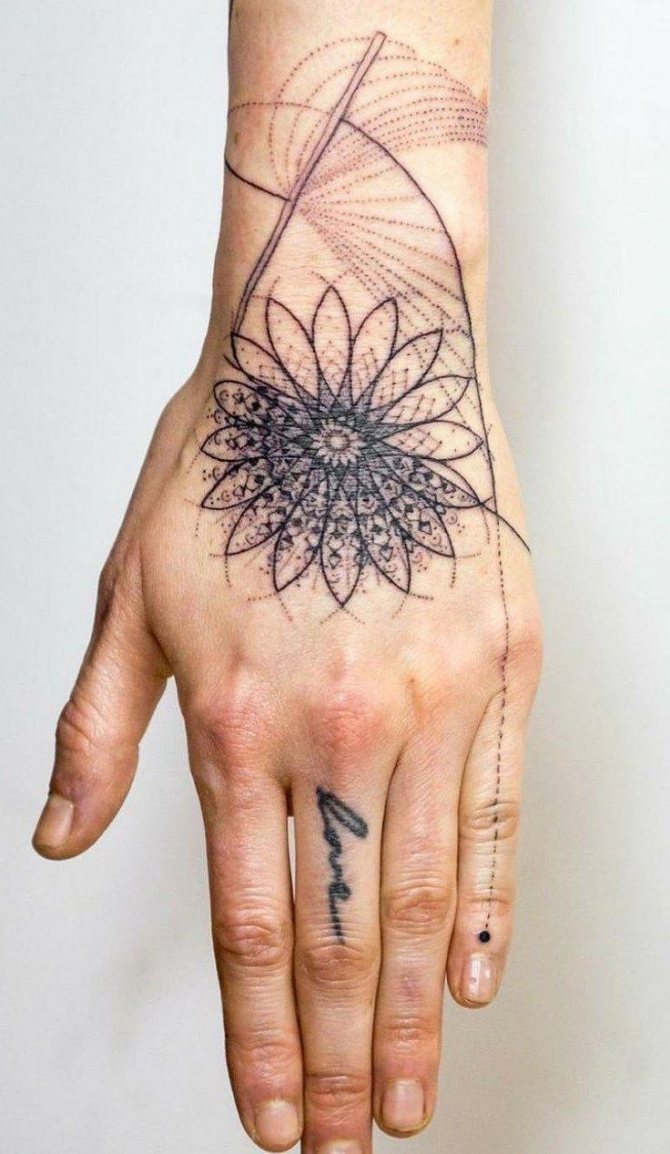
Does it matter which hand the tattoo is placed on?
Not all tattoo ideas for guys imply symmetry and drawing on both hands. If a man only needs to draw on one hand, you can safely experiment with any option - both right and left. There is no subtext in what hand a man chooses, in fact.
There is perhaps an opinion that all personal tattoos, such as inscriptions, names, or portraits of relatives, symbols of love and devotion are applied on the left side, because it is closer to the heart. But all sorts of symbols, animals, weapons, and all kinds of militant and active tattoos are preferred to be placed on the right side.
Do you wear tattoos on your arms?
YesNo
And hands come in all shapes and sizes.
The structure of hands is as individual as facial features. Men's hands are different from women's, young from old, and so on. Here are a few classifications, but they don't cover the full range of hand diversity. A hand can have character-and that's the right word when it comes to their differences. How would you describe the hands you saw today? Gentle, unshaven, wet, dry...?
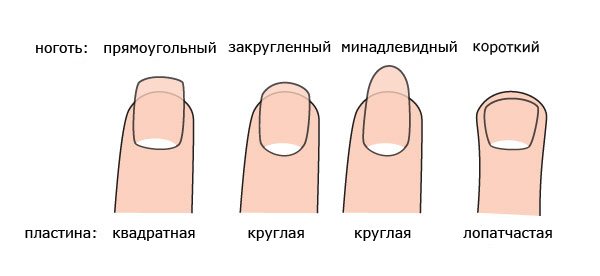
Shapes of hands.
The difference in the proportions of the fingers and palm:
Finger Shapes.
And nails are different from person to person! Even with the same size nail plate, you can apply your desired manicure.