In order for a tattoo to turn out beautifully, it is important to choose the right tool. The choice of needles is the most important part in the creation of tattoos, because with their help you can draw clearer lines or perform a full coloring of the area.
The higher the quality of the material, the more the result will satisfy the customer. Tattoo machine needles come in different diameters, as well as the way they are placed on the solder. The main thing is to choose the right tools to implement the desired pattern, so that it turns out beautiful and even.
How to choose needles for tattoos?
The lion's share of success in tattooing depends on the right choice of needle. However, not every master is able to cope with this task, especially without an impressive baggage of practical experience. The problem lies in a variety of equipment designed to implement the art of tattooing. Different models of tattoo machines, absence of the uniform standard for calibration of needles and a set of manufacturers force to think even professional masters. This article will help everyone who is faced with the problem of choosing needles and make the work easier and more efficient.
Contents
- Types of tattoo needles - design Classic tattoo needles
- Tattoo cartridges - the new wave
- Tattoo pins with long sharpening
- Round solder tattoo needles Round Liner tattoo needles, or RL
- Flat Shader, or FS tattoo pins
Tattoo pins for tattoo needles
The tip can be called the main part of the needle, because it is responsible for its safe attachment and hitting the target. Manufacturers produce a huge number of varieties of tips, but they are always based on the degree of sharpening. There are a total of three variants of cone sharpening:
- Short. The shorter the cone, the more paint will flow down the needle and get under the skin. Such models are indispensable for the full painting of the pattern;
- Medium. The most versatile option, but it is better to use it with the acquisition of some experience;
- Long. Long taper tips are used in liners to draw contours. The longer the tip, the less paint will go onto the needle, which means the line will be thinner and neater. In addition, this type of tip is chosen when working with black pigment, as it leaves the artist more time to work on the drawing.
Big-diameter needles with a short tip leave greasy dots of pigment on the body. Whereas the small diameter and long tip allow for small specks.
However, according to some professional craftsmen, there is no big difference in the size of the cone and with some skill one can work equally effectively with all tips. The choice is determined only by personal preferences. The main thing to buy needles for tattoo machine with which the work will be comfortable and familiar.
Structure of the module
The tool is a plastic housing, welded together needles. Each of them is designed and cast with high precision. The technician can easily change configurations and adjust the machine during a session. The product itself consists of hermetically sealed components:
- A spring mechanism that softens the movement and reduces its amplitude;
- a module with an ink reservoir;
- needles soldered into shape;
- a body made of surgical plastic, safe for clients.
Cartridges are found with a single needle as well as with a whole solder. The adhesives come in:
- flat row: connected in a single row, the needles are used for shading, creating shadows and ultrafine lines (usually two to seventeen in a row);
- Round: three to eighteen long or short twisted needles which are used for micropigmentation, shading and precontouring;
- single needles: they provide deep penetration of the dye and a neat line, so such tools are more suitable for very thin contours, especially convenient when working in the "hair" technique.
The needles themselves are usually made of:
- alloyed steel - an alloy that is resistant to chemicals and strong enough, it does not rust because it contains chemically bound nitrogen, copper, chromium and (or) nickel;
- Nickel - they have an oxide film on their surface that enhances their resistance to chemicals;
- Platinum, which is often used as an alloying element that protects against organic compounds, resulting in the product having a light, silver, almost white color.
The material affects the cost and quality of the needles, as well as the safety of the procedure.
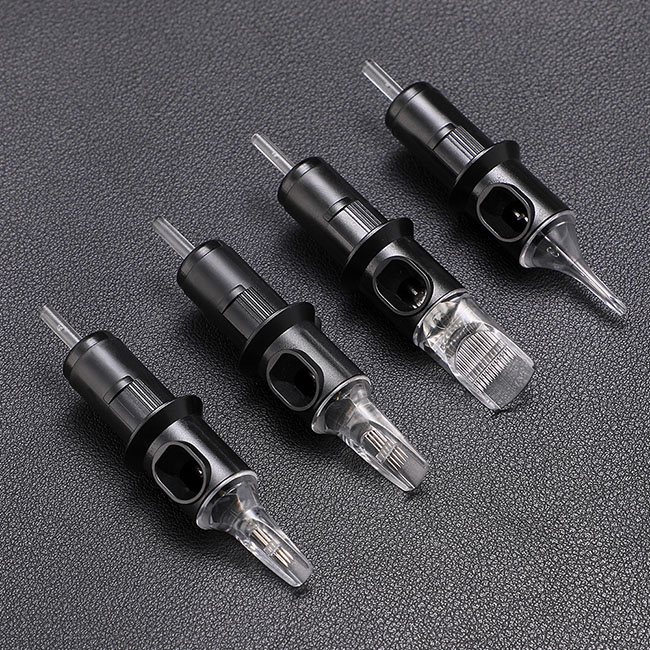
Sophisticated design of the cartridge allows you to quickly prepare for the session. Any beginner will be able to install it without asking for help.
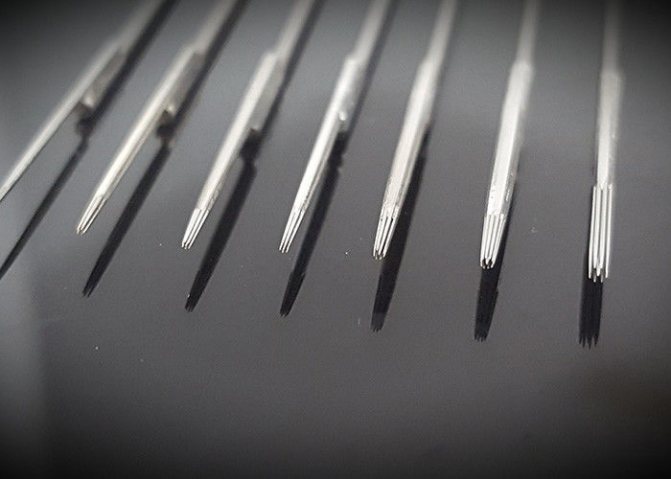
Needle thickness and number
All needles differ in diameter (total spike width), shape, and the number of fine elements included in the spike. These are the main characteristics responsible for the level of skin damage and the amount of dye pigment that goes under the skin with each stroke.
Needle sizes can range from 0.2 mm (size 6) to 0, 35 mm (size 12). The thinner the needle, the harder the line will be. Conversely, it is better to use wide needles for full and fast painting. The tenth size, 0.3 mm, is considered optimal for painting.
What are textured needles
Textured games for permanent makeup retain more pigment. Compared to smooth models, no more dye is left inside when they adhere to the skin.
The textured tool should be worked slowly and is best used to paint the lip contour tightly. The product is not suitable for eyelids and other delicate, thin skin areas.
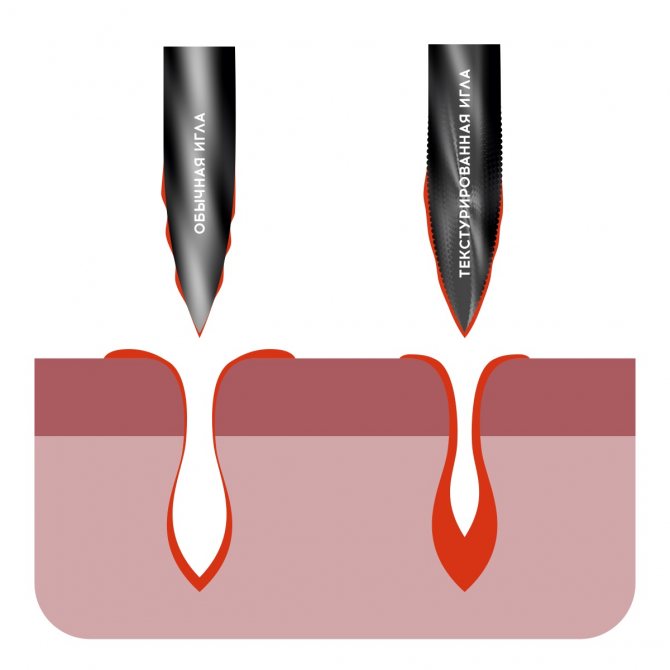
The naked eye will not notice the difference, but unlike polished needles, textured needles are riddled with microbeads. The area of such a tool is larger (although the length and diameter do not change), and the pigment cannot slip off the rough surface. Even from one pass more dye remains under the skin. Due to this, faster healing, least traumatization and maximum speed of pigment application is achieved.
Shape of tattoo needles
There are several varieties of adhesives, each designed to achieve a particular result. Conventionally, all needles can be divided into two main types: liners and shaders. The former are designed for sharp lines and detail in images. The latter are ideal for filling or shading pigment. Numerous modifications are based on these models.
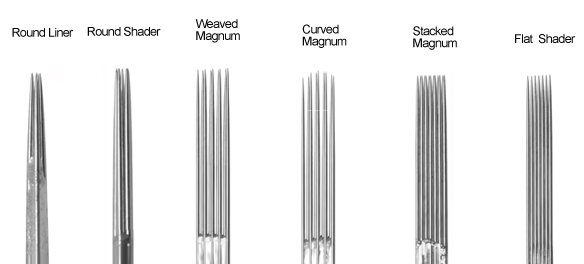
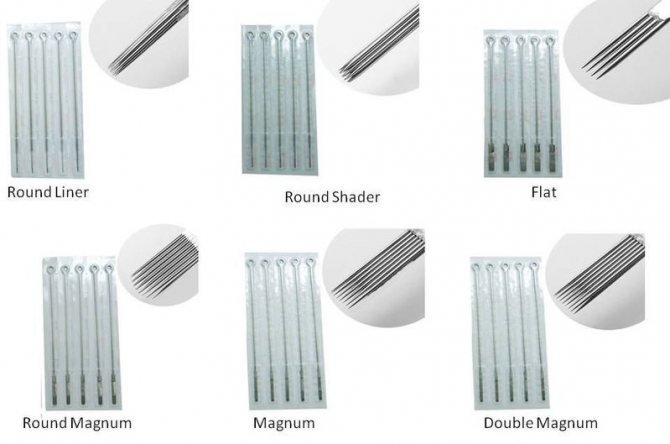
Round Liner (RL).
The needle is a round spike with the ends of the thin elements brought together at the bottom. The number in the needle name indicates the number of elements soldered on a single bar and it is the number that affects the line thickness. The more needles in the meld, the thicker the contour lines.
Most often this type of needles is used when working with lettering or permanent makeup, which requires delicate tracing of small size elements. For this type of needle is suitable for any tattoo machine: an induction liner or rotor exposed to a hard blow.
Round Shader (RS)
Loose Needles. This solder is most often used to paint over the design. It is ideal for creating circular patterns. Equally effectively with it will work, as the induction shader, and the rotary tattoo machine adjusted under the soft blow.
Magnum
The most in demand for the shading of the pigment in a monochrome coloring of large areas of skin. They are subdivided into types: M1 and M2. In the first splicing, the ends of the needles are staggered and are used for soft shading and creating shadows. A shader induction tattoo machine or a soft-impact rotor is suitable for them. The M2 is a double-row spider designed for deep and dense shading.
Round Magnum (RM).
The gentlest needles, causing minimal damage to the skin. Most often used for gentle surface shading.
Flats (F; FS).
One of the favorite professional style. Allows you to change colors, create halftones and smooth color transitions. Thin elements in the solder are placed tightly in a single row.
Whatever type of work the master does: full paint, design contour lines or create shadows, it is necessary to choose the right tools that will improve the quality of the drawing without unnecessary complications. Each drawing technique involves the use of certain adhesives. For example, textured needles are more suitable for painting. Their disadvantage is a strong damage to the skin, but the drawing is richer and clearer. And, of course, such needles should not be used for permanent makeup. For this type of work it is necessary to buy thin needles that leave as few wounds as possible. Most often, a needle for this purpose is made of precious or semi-precious alloys: platinum, alloy steel or nickel.
Needle Soldering Configuration
Needles can be soldered together in different variations and in different numbers. The minimum number of soldering is two needles, the maximum reaches 30, although in rare cases there may be more. A distinction is made between:
- R or round, called needles soldered in a circle. There are contoured - "liner" (denoted RL) or inked - "shader" (denoted RS). Contour needles are distinguished by the fact that these needles are tightly soldered together and brought together in a kind of "bundle". As the name implies, they are used to create thin lines. Masters prefer a shorter sharpening and a smaller diameter for this type of needle. In "shader" melding, the needles are on the contrary, so that they are parallel. The convenience of this type of pairing, in a larger surface area of the shading. Needles with a large diameter and medium sharpening are used more often.
- Mwhich stands for "magnum," this is the name given to the mating of needles in rows over one another. Two types are also subdivided. M1, have a common base, but diverge towards the end, which provides a softer shading and the ability to adjust its degree. M2, soldered close together, allow a dense shading.
- F, aka Flat, flat needles fused in one row. Diameter and sharpening in this case is very variable. These needles are also used to achieve a dense shading. Such needles are soldered in a single line, in the shape of a crescent. This is to ensure that the shading is accurate, without sharp transitions and causes less damage to the skin.
Producers
Any workshop that makes tattoo machines also works on the production of tool accessories. Therefore, there is no point in singling out the top manufacturers of needles.
Choosing spare parts and equipment, it is better to pick up models of the same brand as the tattoo machine itself. In addition, most manufacturers popular with artists are special sets that include in addition to the machine all the necessary equipment, including a set of needles. This is an ideal choice for those who are just comprehending the art of body painting and do not yet have much experience.
How the cartridge works
To begin with, let's look at the structure of the cartridge. It consists of:
- A body made of medical plastic;
- The needles themselves, made of copper steel. And there are two ways to join them: F is flat and R is round;
- A compartment for ink;
- A spring mechanism that cushions the movement of needles, which makes the process less painful.
The good thing about the modules is that:
- The process becomes more efficient and faster;
- Everything is sterile and sealed, so there is no need for additional treatment of needles;
- Less vibration, thanks to a special device, which leads to the fact that the work is done very accurately.
Among the disadvantages clearly stands out the price and the fact that there are fewer options for soldering such modules, which means that there are fewer opportunities for work, too.
In general, depending on the work performed the needle or cartridge is suitable, well, and, of course, the master himself can be more convenient to work with one or the other tool.
How to apply a tattoo on your own?
All the preparatory work is over? Then it is time to consider in detail how to make a tattoo with a needle yourself. The whole process is divided into several steps.
Step 1
Sterilize the needle - fire is ideal for this:
- It is necessary to hold it directly over a flame of a lighter or a candle until it becomes fiery red.
- The other end should be held with a rag to protect your fingers from burning.
- Then wrap the needle with cotton thread, 3 mm from the tip, gradually wind the thread in a range of 6 mm, so that as a result you have an oval ball. This is important, because when you lower the needle into the saucer, the thread will absorb the ink.
Important: For more convenience, you can pin it to the tip of the pencil by simply poking an eraser on it and wrapping the thread around the top.
Step 2
Dip the needle into the ink, puncture the skin and leave a small dot. A drop of blood may appear. Sometimes there will be a little pop when you pierce the skin.
Important: Remember that only the top few layers of skin need to be pierced. When all the steps are done correctly, the skin will slightly hold the needle when you pull it out.
Step 3
Working along the lines:
- Gradually fill in the drawing with small dots, sticking to the lines.
- To remove excess ink or blood, use a cloth or cotton swabs.
Important: As you pierce, the skin swells a little, which at first makes the tattoo look heterogeneous. To get smooth lines, you may have to tweak the design a bit after the swelling goes down.
Step 4
Cleaning the tattoo:
- After the entire design has been applied, you should wipe down the area with alcohol.
- Throw away the remaining tools because they are no longer sterile.
- Use a new needle for correction.
How to prepare for a tattoo?
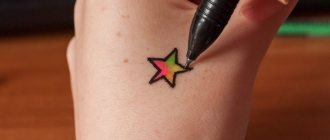
To create a body art at home, you will need an ordinary gel pen and needles.
Important! This technique differs from the real tattoo by the fact that not so deep ink penetrates under the skin. But do not be frightened, because the punctures are so insignificant that in a couple of weeks the partak will disappear from your skin. This is due to the fact that human skin renews itself very quickly, so such drawings can be done often.
Before beating a partak with a needle, prepare properly for the work, follow these steps.
Step 1
Buy a special kit at the store for home use. It usually includes needles and special ink. You can use the needle as long as it is new and perfectly clean.
If you cannot use special inks, use a regular gel pen. Such kits are absolutely safe and contain, in addition to the necessary tools, also the instructions.
Important! Make sure that the ink is black, because colored inks are more often toxic.
You can use any type of needle - sewing needles, straight pins, safety pins. The main thing is to make sure they are sterile.
Important! Old needles are absolutely not suitable for this purpose. Also, one needle should not be used by more than one person at a time, as this often leads to serious infections.
Step 2
Properly equip your place of work. Find a few more useful things - a permanent marker, a water cup, a cotton cloth, some clean rags, alcohol.
Step 3.
Shave and thoroughly clean the skin area to be tattooed. It is important that the chosen area is perfectly clean, well washed in warm water. The skin should then be sterilized with alcohol using a cotton swab.
Step 4
Directly on the skin, draw the chosen picture. On the chosen place, draw the picture. It is better if it is done by another person, so that it turns out clearer. It is this step that should be given maximum time.
Since you will be making a tattoo on your own, you should pick out for it the most convenient, accessible from all sides of the place. On the work you will take not more than several hours, it all depends on the complexity of the picture. Hard-to-reach places such as the shoulders and chest should not be chosen, because you will have to twist a lot to apply the pattern.
Video footage
As it turned out, anyone can figure out how to make a tattoo at home with a needle. The main thing here is not experience at all, the greatest importance is how seriously a person will take this process, whether he will follow all the recommendations concerning the care of it. But remember that home tattooing is always associated with the risk of getting serious infections. In no case do not use strange or old needles, in order not to become a carrier of hepatitis, HIV or staphylococcus.